

Dual booting is a great way to get the best of both worlds of Windows and Linux. It’s relatively straightforward to install the two operating systems alongside each other, and it’s also a great opportunity to learn more about computers and how software works.
When building your own computer, you get to choose from various hardware components that will go into your system. There are some compatibility restrictions to be aware of, but you’re still left with plenty of options even if you go Team Green, Team Red, or Team Blue.
Once you put everything together and get that glorious POST beep, you’re on your way to enjoying your new rig! However, before you start to game on it, word process, or just browse the internet, there is one crucial component that still needs to be installed: the operating system!
The number of OS options quickly reduces to just a handful of them. For most, Windows is the defacto operating system for the PC. Many use it for their day-to-day jobs, it supports many applications natively, and there is a whole market presence in its wake.
macOS is Apple’s proprietary operating system. However, you can’t simply install macOS on your new rig, given the licensing and restrictions placed on non-Apple hardware. Folks have figured out how to pull it off, but according to Apple, such methods are illegal.
Dual booting is a great opportunity to learn more about computers and how software works
Third, there is Linux. As we’ve covered before, there are many flavors of Linux, and you can choose the one that best suits your needs. Fundamentally though, they all are derived from one Linux kernel, so we’re going to bunch them up all together for the sake of argument.
So essentially, you come down to a simple choice: do you install Windows or Linux? In this article, we’re going to explore the option, “Why not both?”
Why Linux? And Why Dual Boot?
If you are like most people, the safer and closer-to-home option is to simply “install Windows.” You probably use it more anyway, and it should work out of the box. So why even bother with Linux?
Well, for one, most Linux distros are free, so you can potentially save some money. Since the core Linux kernel is open-source, and most Linux OSs remain free, you can even track the latest OS features by following its development.
Linux is also relatively lightweight upon installation. It comes with little bloatware and the hardware requirements are typically much more modest than Windows: it needs less RAM, takes up a smaller install size on your disk, supports older CPUs, and let’s not even bring up TPM. This can make some Linux distributions ideal OS choices if trying to resurrect an old computer.
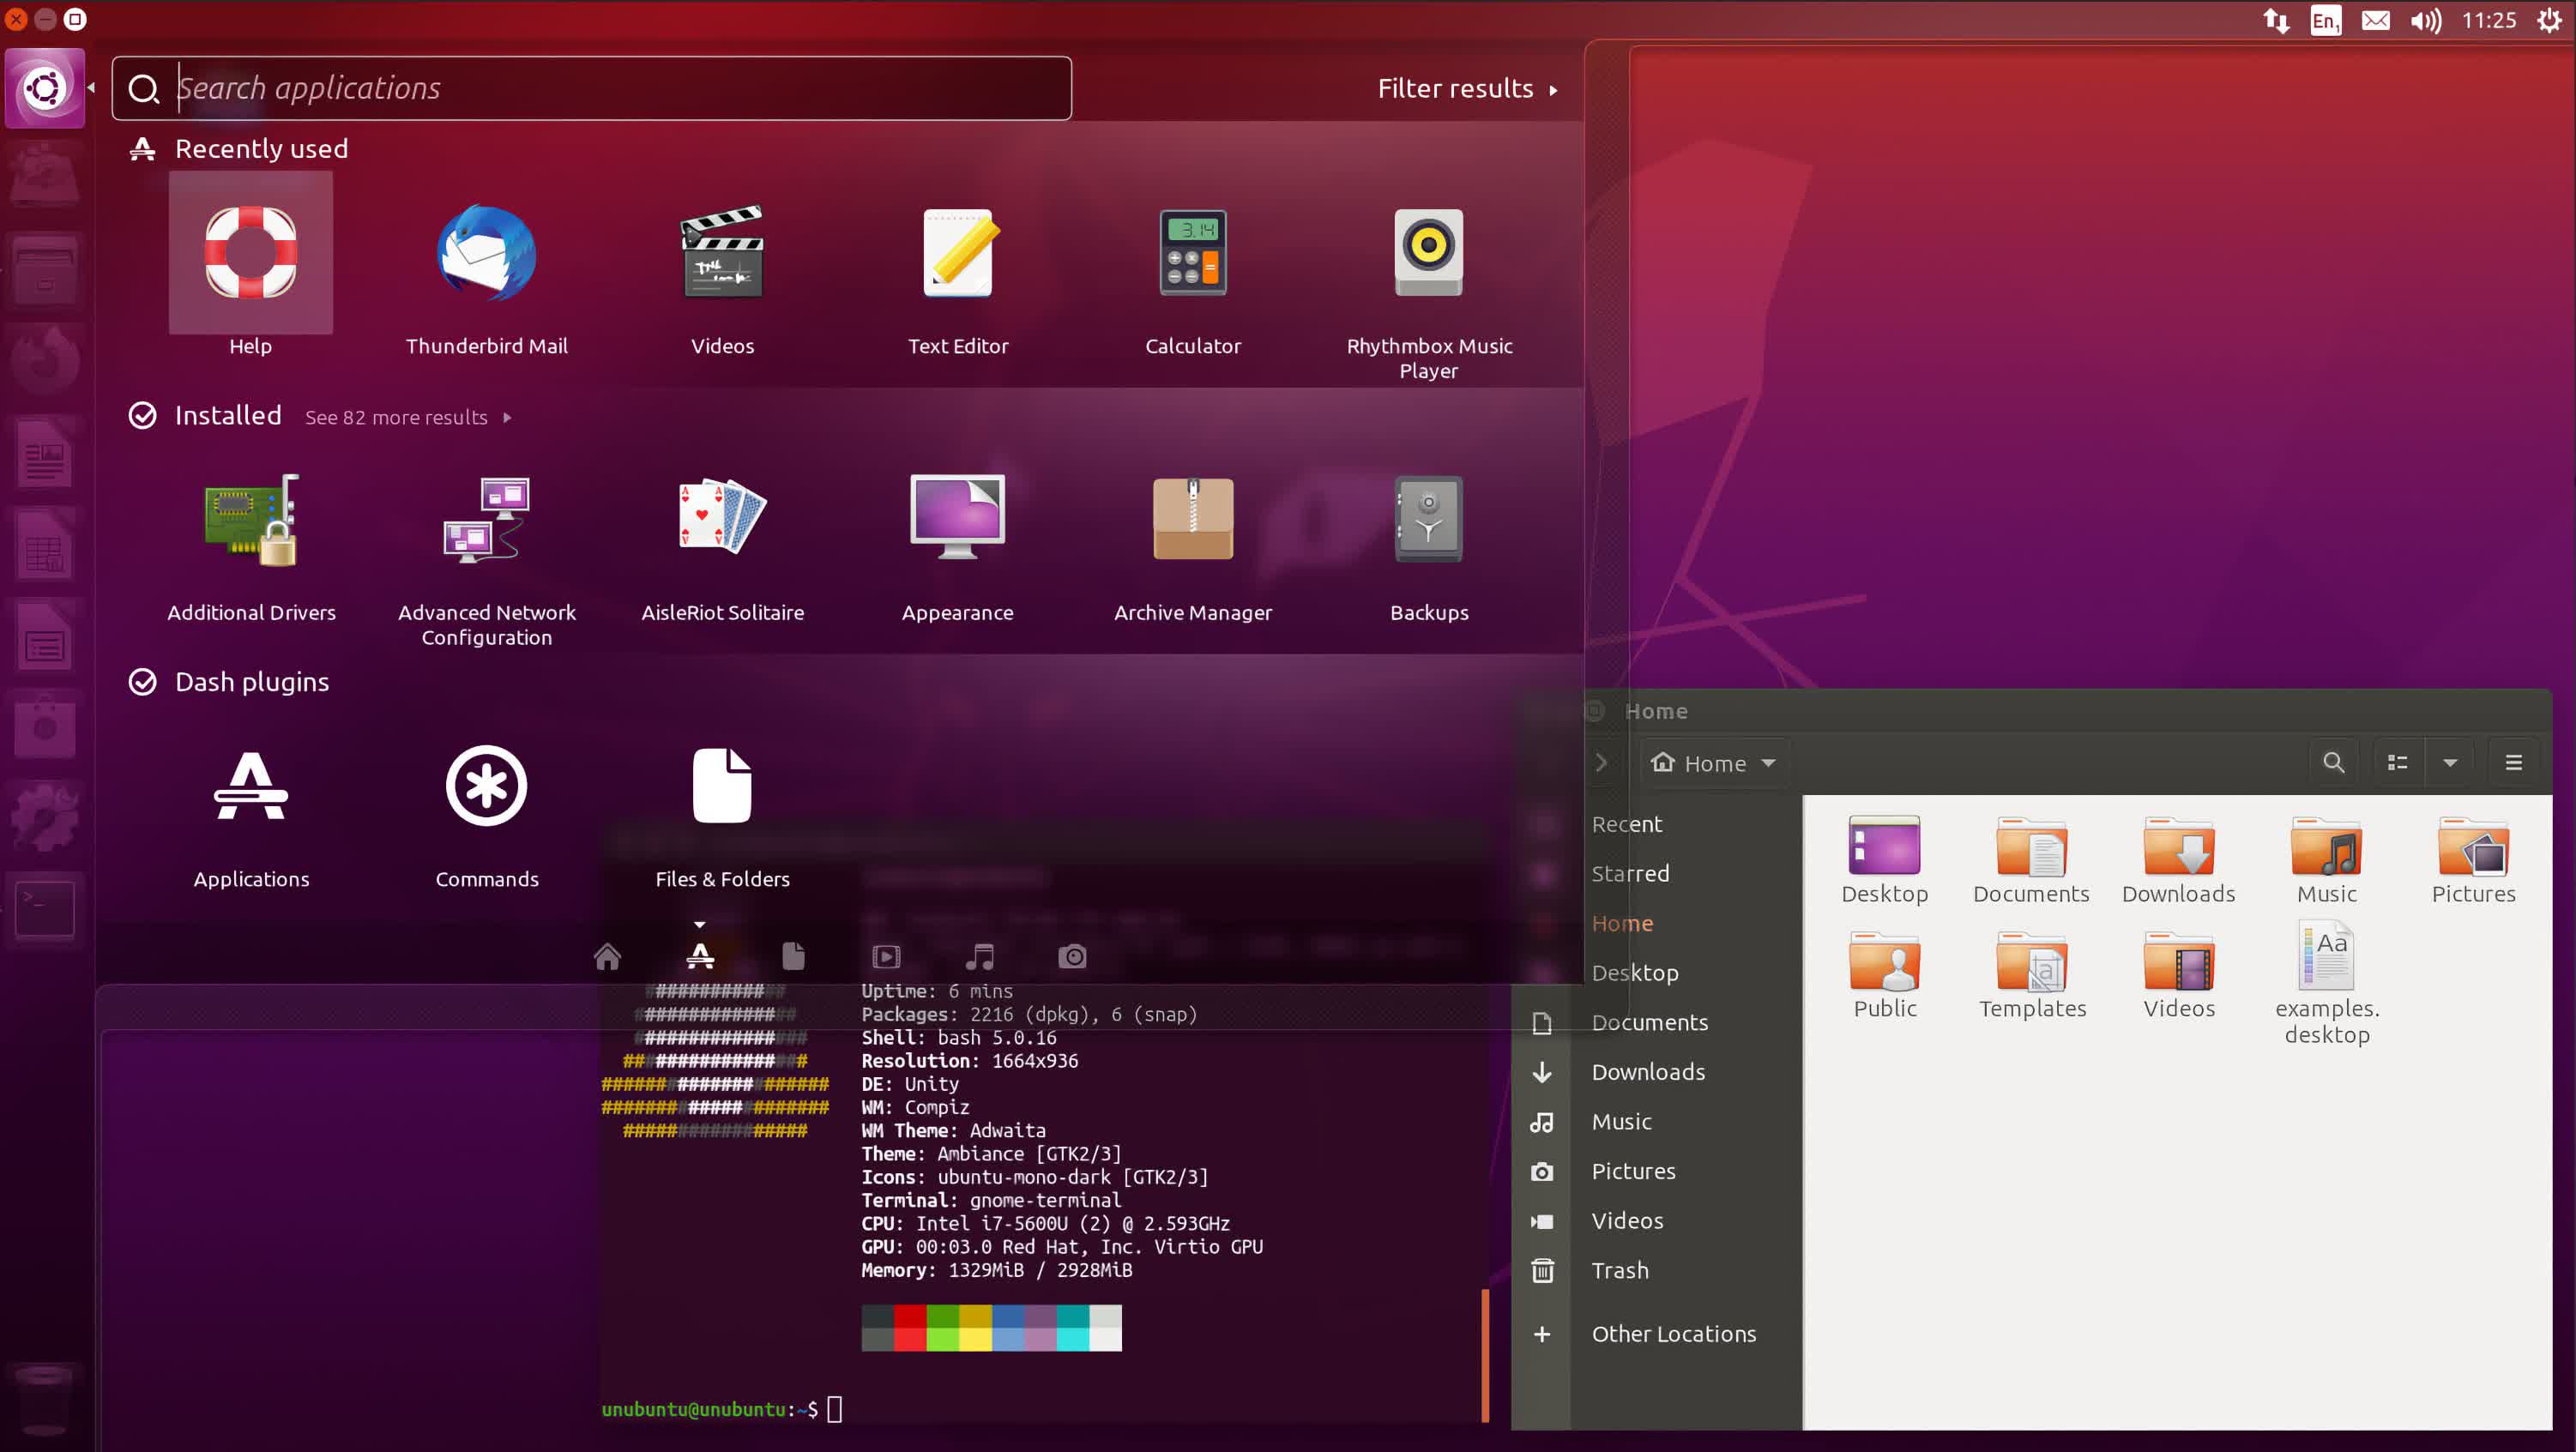
For most folks though, Linux offers a wealth of customization opportunities — starting from the choice of the Linux distro itself! Each distro is unique in its own way. We refer the reader to this article we wrote a while back for a rundown on many popular choices.
Even within a distro, you can customize the look and feel by choosing different window managers, animation choices, desktop options, you name it. And with a strong and vibrant community, you can typically get the best tech support on many forums for what you might be looking for.
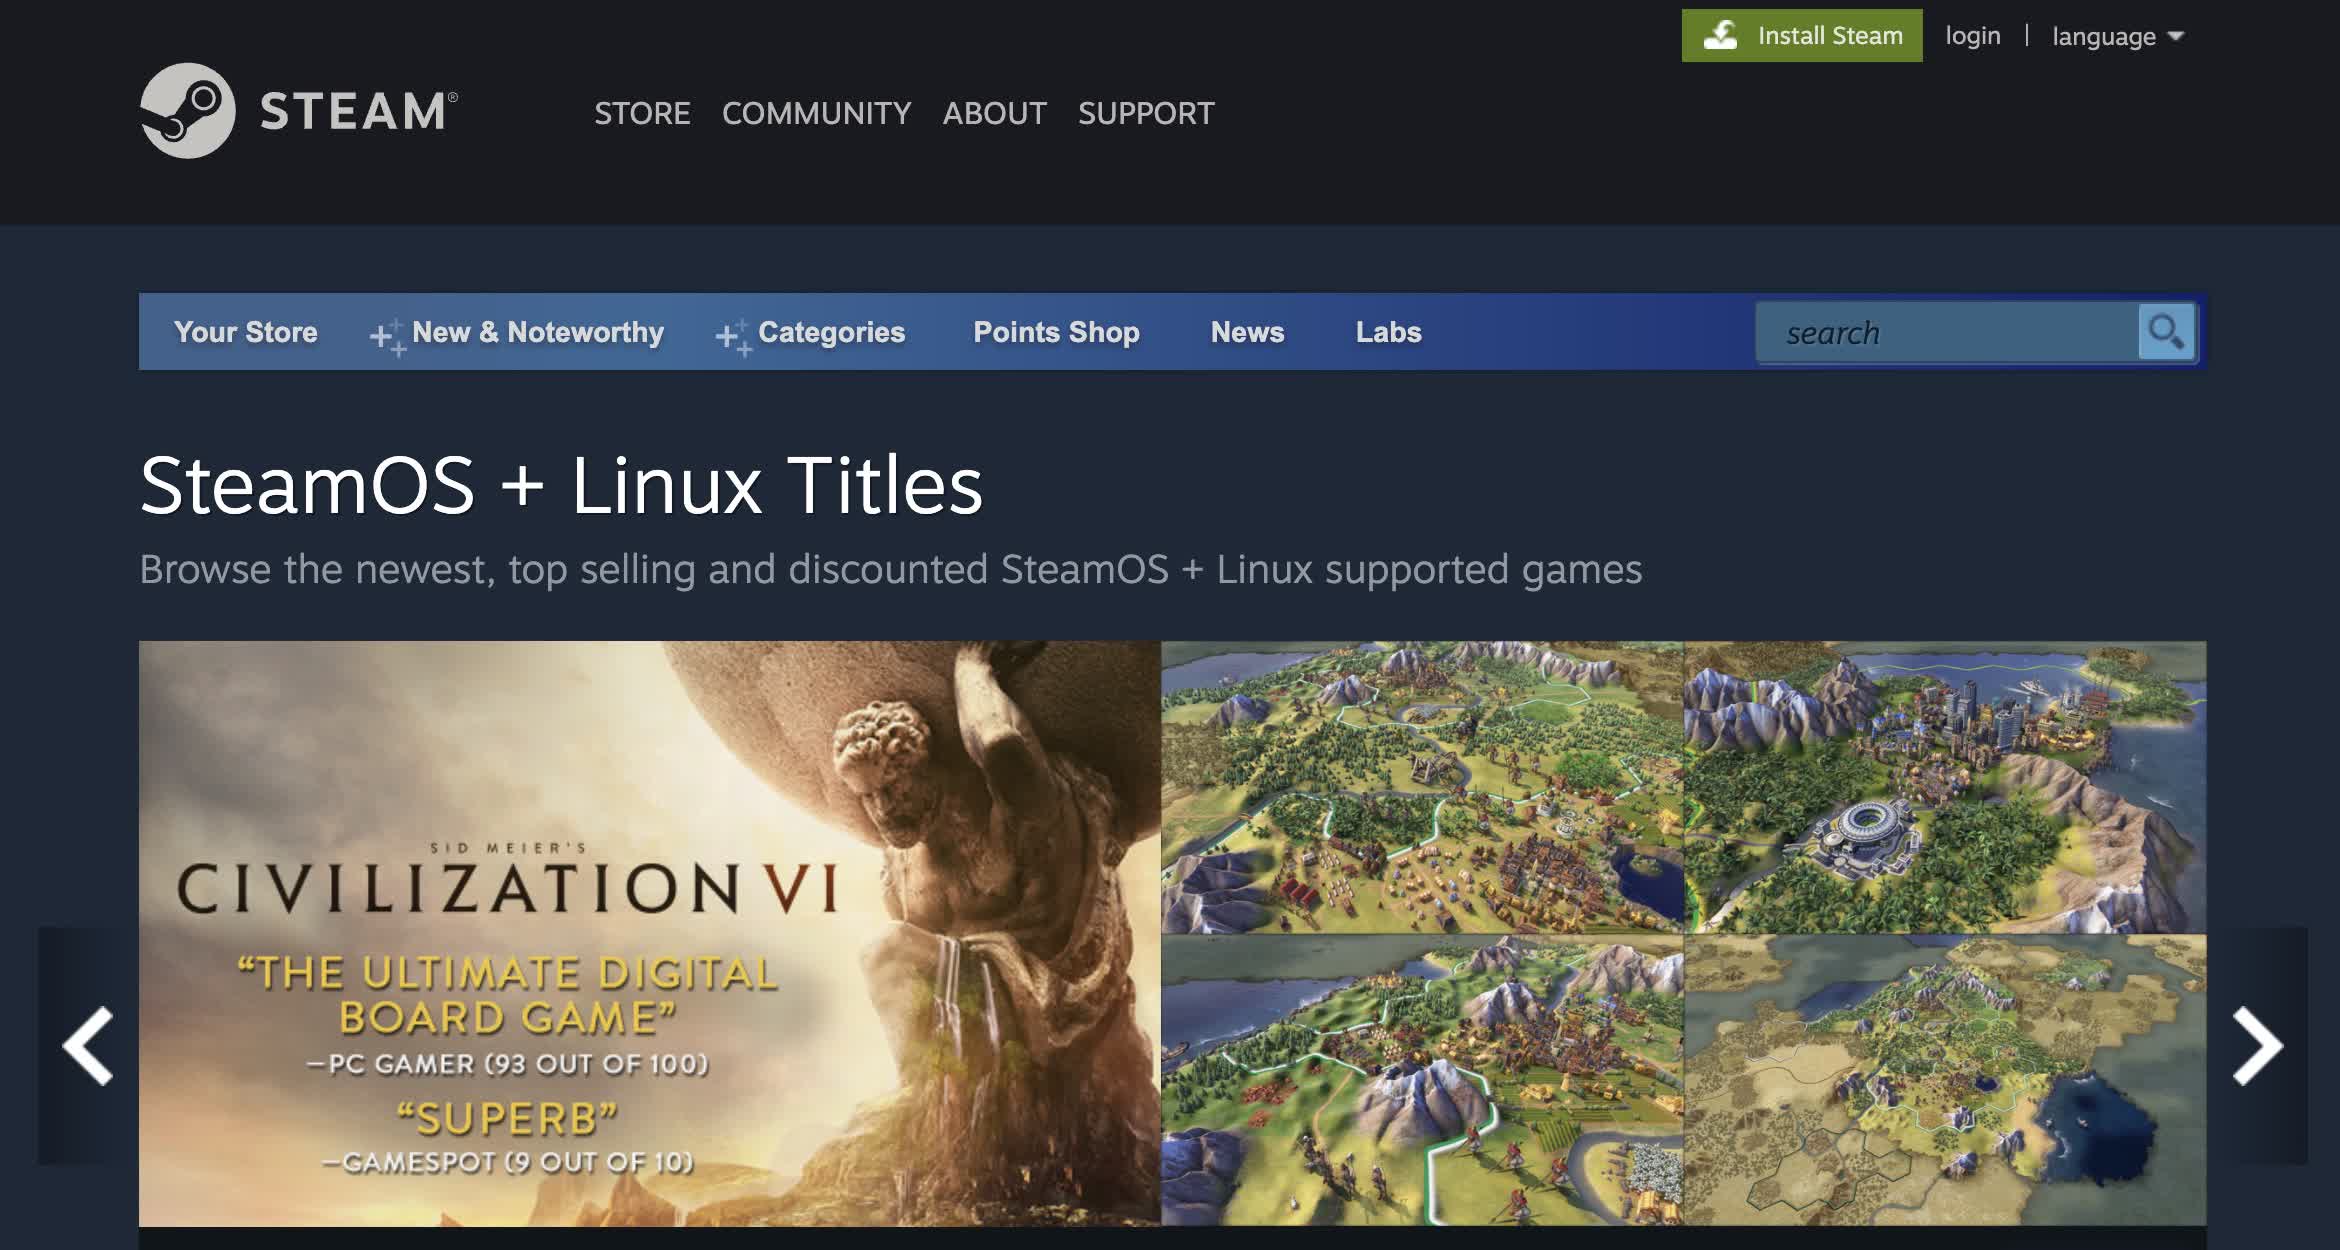
Linux doesn’t have everything though. For example, certain applications might be specifically coded up for a Windows or Mac environment, and thus not work in Linux. There are a plethora of open-source alternatives that you can use, but certain things (like games) might be glaringly missing. This has started to change — Steam has begun supporting many games on Linux — but these are some trade-offs you’d need to consider before deciding to abandon Windows altogether for the open-source life.
But again, why abandon anything? Why not install both Windows and Ubuntu side-by-side, and benefit from the best of both worlds? This is precisely the concept of “dual booting,” and it requires just a little bit of guidance to get you along the way.
Before jumping in, we wanted to give a bit of an explainer on what is going on underneath-the-hood in your computer when dual booting. The following section isn’t a requirement to dual booting, but will provide a certain background in the various choices and complexities about why there needs to be a guide on this in the first place.
What Happens Underneath the Hood at Bootup?
When you press your PC’s power button, the motherboard takes hold and begins the boot process. Control is handed off to the BIOS, which will run some basic diagnostics and check that the required hardware is in place and functional (RAM, storage, keyboard, mouse, etc).
The BIOS will then seek the master boot record to begin booting up the OS and allow you to start running applications on your hardware.
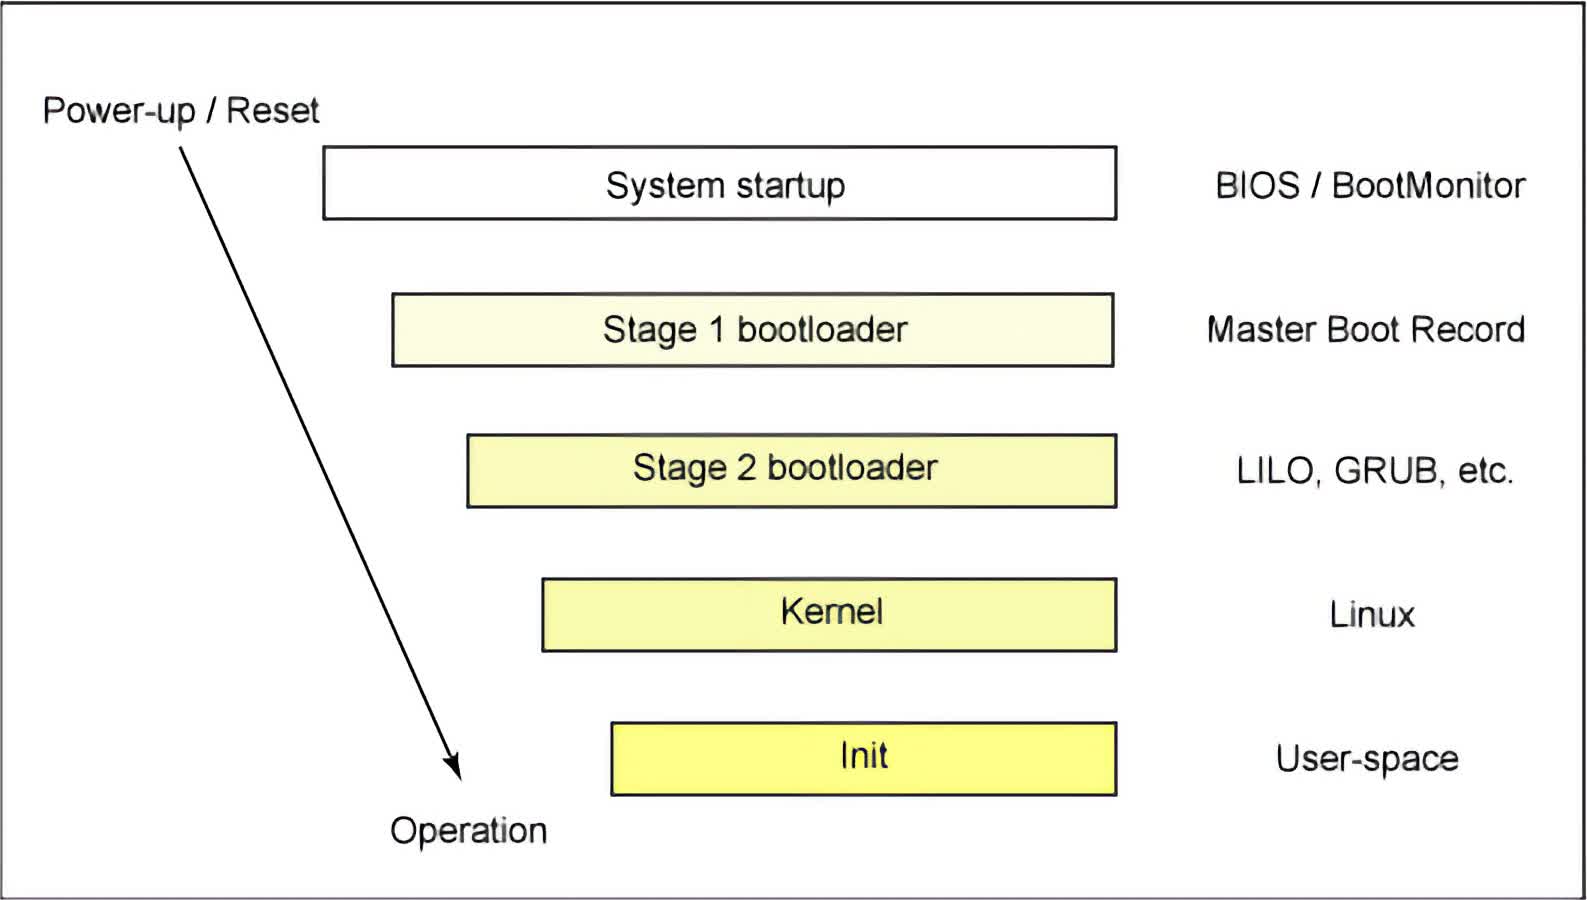
The master boot record (MBR) is typically stored as the first block of a bootable disk (whether a HDD, SSD, USB drive, etc). The MBR location is hardcoded to make sure it can be found during the boot process. Its job is relatively simple: find and boot the OS. However, this is where some of the magic begins.
The MBR itself is too small to include all the information on how to boot an OS. Instead, it typically points to a bootloader, which is tasked with the actual process of reading the OS details and loading the necessary files into RAM, and begin the general process of preparing the OS to be used. Different OSes typically have different boot loaders. Windows naturally names it the Windows Boot Manager, while on Linux the bootloader is called grub.
When dual booting, you now want to introduce multiple OSes into the mix, and also give yourself the option to select the OS you wish to boot up from. How do you do that? Well, you need an OS for selecting the OS! In the Linux world, that “operating system” is (also) called grub.
The general simplistic procedure for dual booting then is as follows:
- Install the first OS. It is highly recommended to start with Windows, since grub can easily recognize Windows, while the Windows Boot Manager is optimized to work just for Windows.
- Partition the disk. Split up your disk to provide storage space for each OS separately.
- Install the second OS. In this case, that would be a Linux distribution such as Ubuntu.
Once the installation is done, you will automatically overwrite the Windows bootloader with grub.
Grub then scans the disk, and identifies all the different OS versions installed on it. It will record the disk location of each OS’ bootloader, so that it can jump to the respective bootloader once the user makes their choice.
Grub is typically installed as part of the Linux installation process for most distros (such as Ubuntu). This makes it easy to just follow the installation guide, and the process is seamless. Installing a new OS requires a flash drive that is separate from the main storage, since you technically have to boot from the USB to perform the installation of the first and second OS.
You do not need to necessarily know all of this information to dual boot your PC. We’ll explain each process along the way, but feel free to jump back to this section if you’re curious what each step is doing.
Before you Start
There are certain things you need before beginning, as well as a few highly recommended things to keep in mind. In this tutorial, we’ll be dual booting Windows 11 alongside Ubuntu 20.04 LTS (long term support).
The basics:
- Make sure your PC satisfies the OS requirements for Windows 11.
- Make sure your PC satisfies the OS requirements for Ubuntu 20.04 LTS:
- 2 GHz dual-core processor
- 4 GB RAM (but 1 GB can work)
- 25 GB of hard drive space
- VGA capable of 1024×768 screen resolution
- Enough storage space to hold both operating systems.
- According to current specifications, the recommended size of Windows 11 and Ubuntu LTS 20.04 is 25 GB each. So the minimum storage medium should have at least 50 GB of space.
- We highly recommend dual booting with at least 128 GB of storage.
You will need two (2) flash drives for the installation process, each with at least 8GB of storage space. We recommend at least 8 GB for the storage medium that will be used to install Ubuntu, and at least 16 GB for the storage medium for installing Windows 11. You should not use a single flash drive to hold both images. This will cause a headache when trying to boot from the flash drive for installation.
When dual booting, you can decide how much storage space to allocate to each OS. There is one very important caveat to keep in mind though: while using Ubuntu, you will have access to all your Ubuntu files as well as your Windows files through the file system.
However, when you are in Windows, you will not be able to access the files on your Ubuntu partition. The reason is that Windows does not support the Linux file system, including ext4. As a result, Windows cannot directly read or detect an ext4 partition or device.
A simple workaround is that you can still have multiple physical drives in your system, and use the “other” devices for shared file access. As long as the secondary drives are formatted in an NTFS file format, then the additional drive will be visible while you are in either OS.
Finally, even though you can technically dual boot across two different SSDs, we would not recommend it. It adds a lot of complexity that might not be worth managing and debugging (as explained briefly in the previous section).
Step-by-Step for Dual Booting
After checking that you have your PC up to spec, decided on an SSD for the installation, and have your two flash drives on the ready, you can dive right in and begin the process!
1. Download the ISO for each operating system
You can download both Windows 11 and Ubuntu 20.04 ISOs directly from our download section.
2. Create bootable thumb drives for each OS
After the downloads are complete, you’ll need to move them over to a flash drive and make the flash drives bootable. Unlike copying files directly onto a flash drive, making the drive bootable requires adding certain metadata to signify to the BIOS that the drive includes OS-related files during bootup. The utility tool will do that automatically for you.
2.1 Download a utility tool for creating bootable USB drives
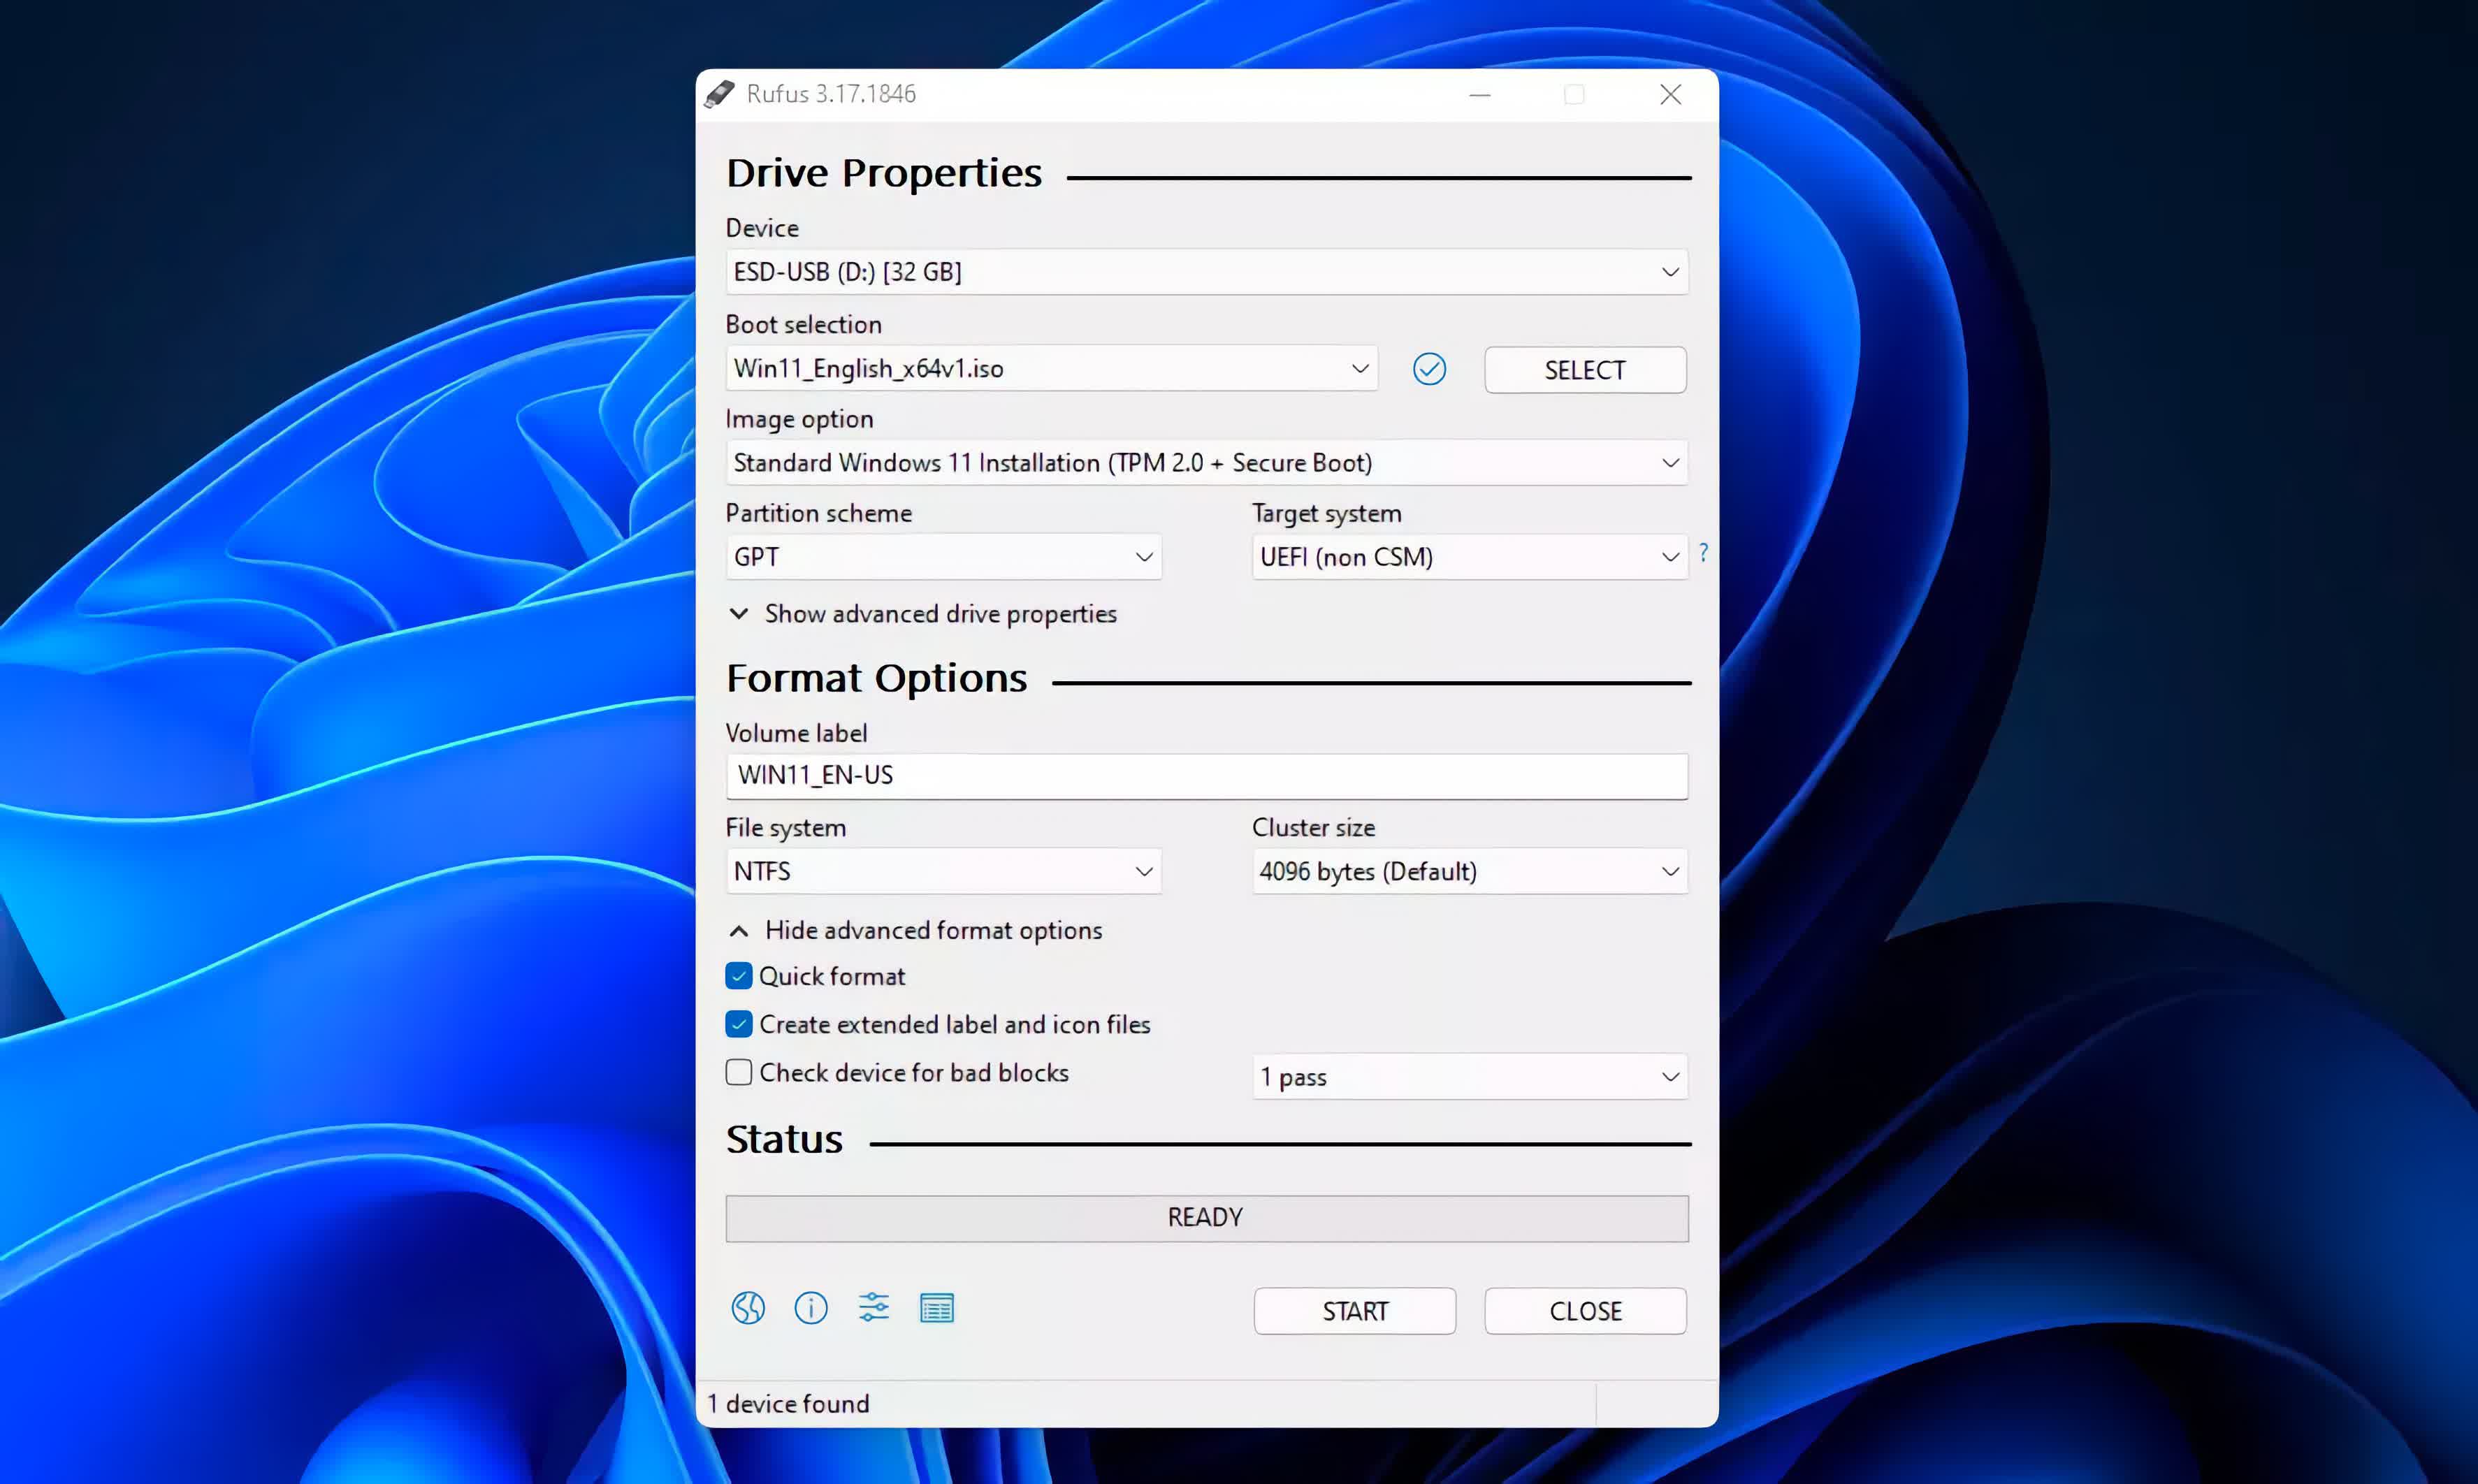
There are plenty of tools for this, but we recommend Rufus. Not only is it a simple tool, but it also works well for both Windows and Ubuntu ISOs.
2.2 Create a bootable thumb drive for OS 1: Windows 11
This step depends on whether or not you plan to dual boot on a machine that has Windows 11 installed on it (in other words, you plan to just add Ubuntu to a pre-existing system), or if you are installing on a new machine without any operating systems.
If you already have Windows installed as your first OS, then you can skip forward to Step 2.3, and you just need to prepare one bootable flash drive containing Ubuntu.
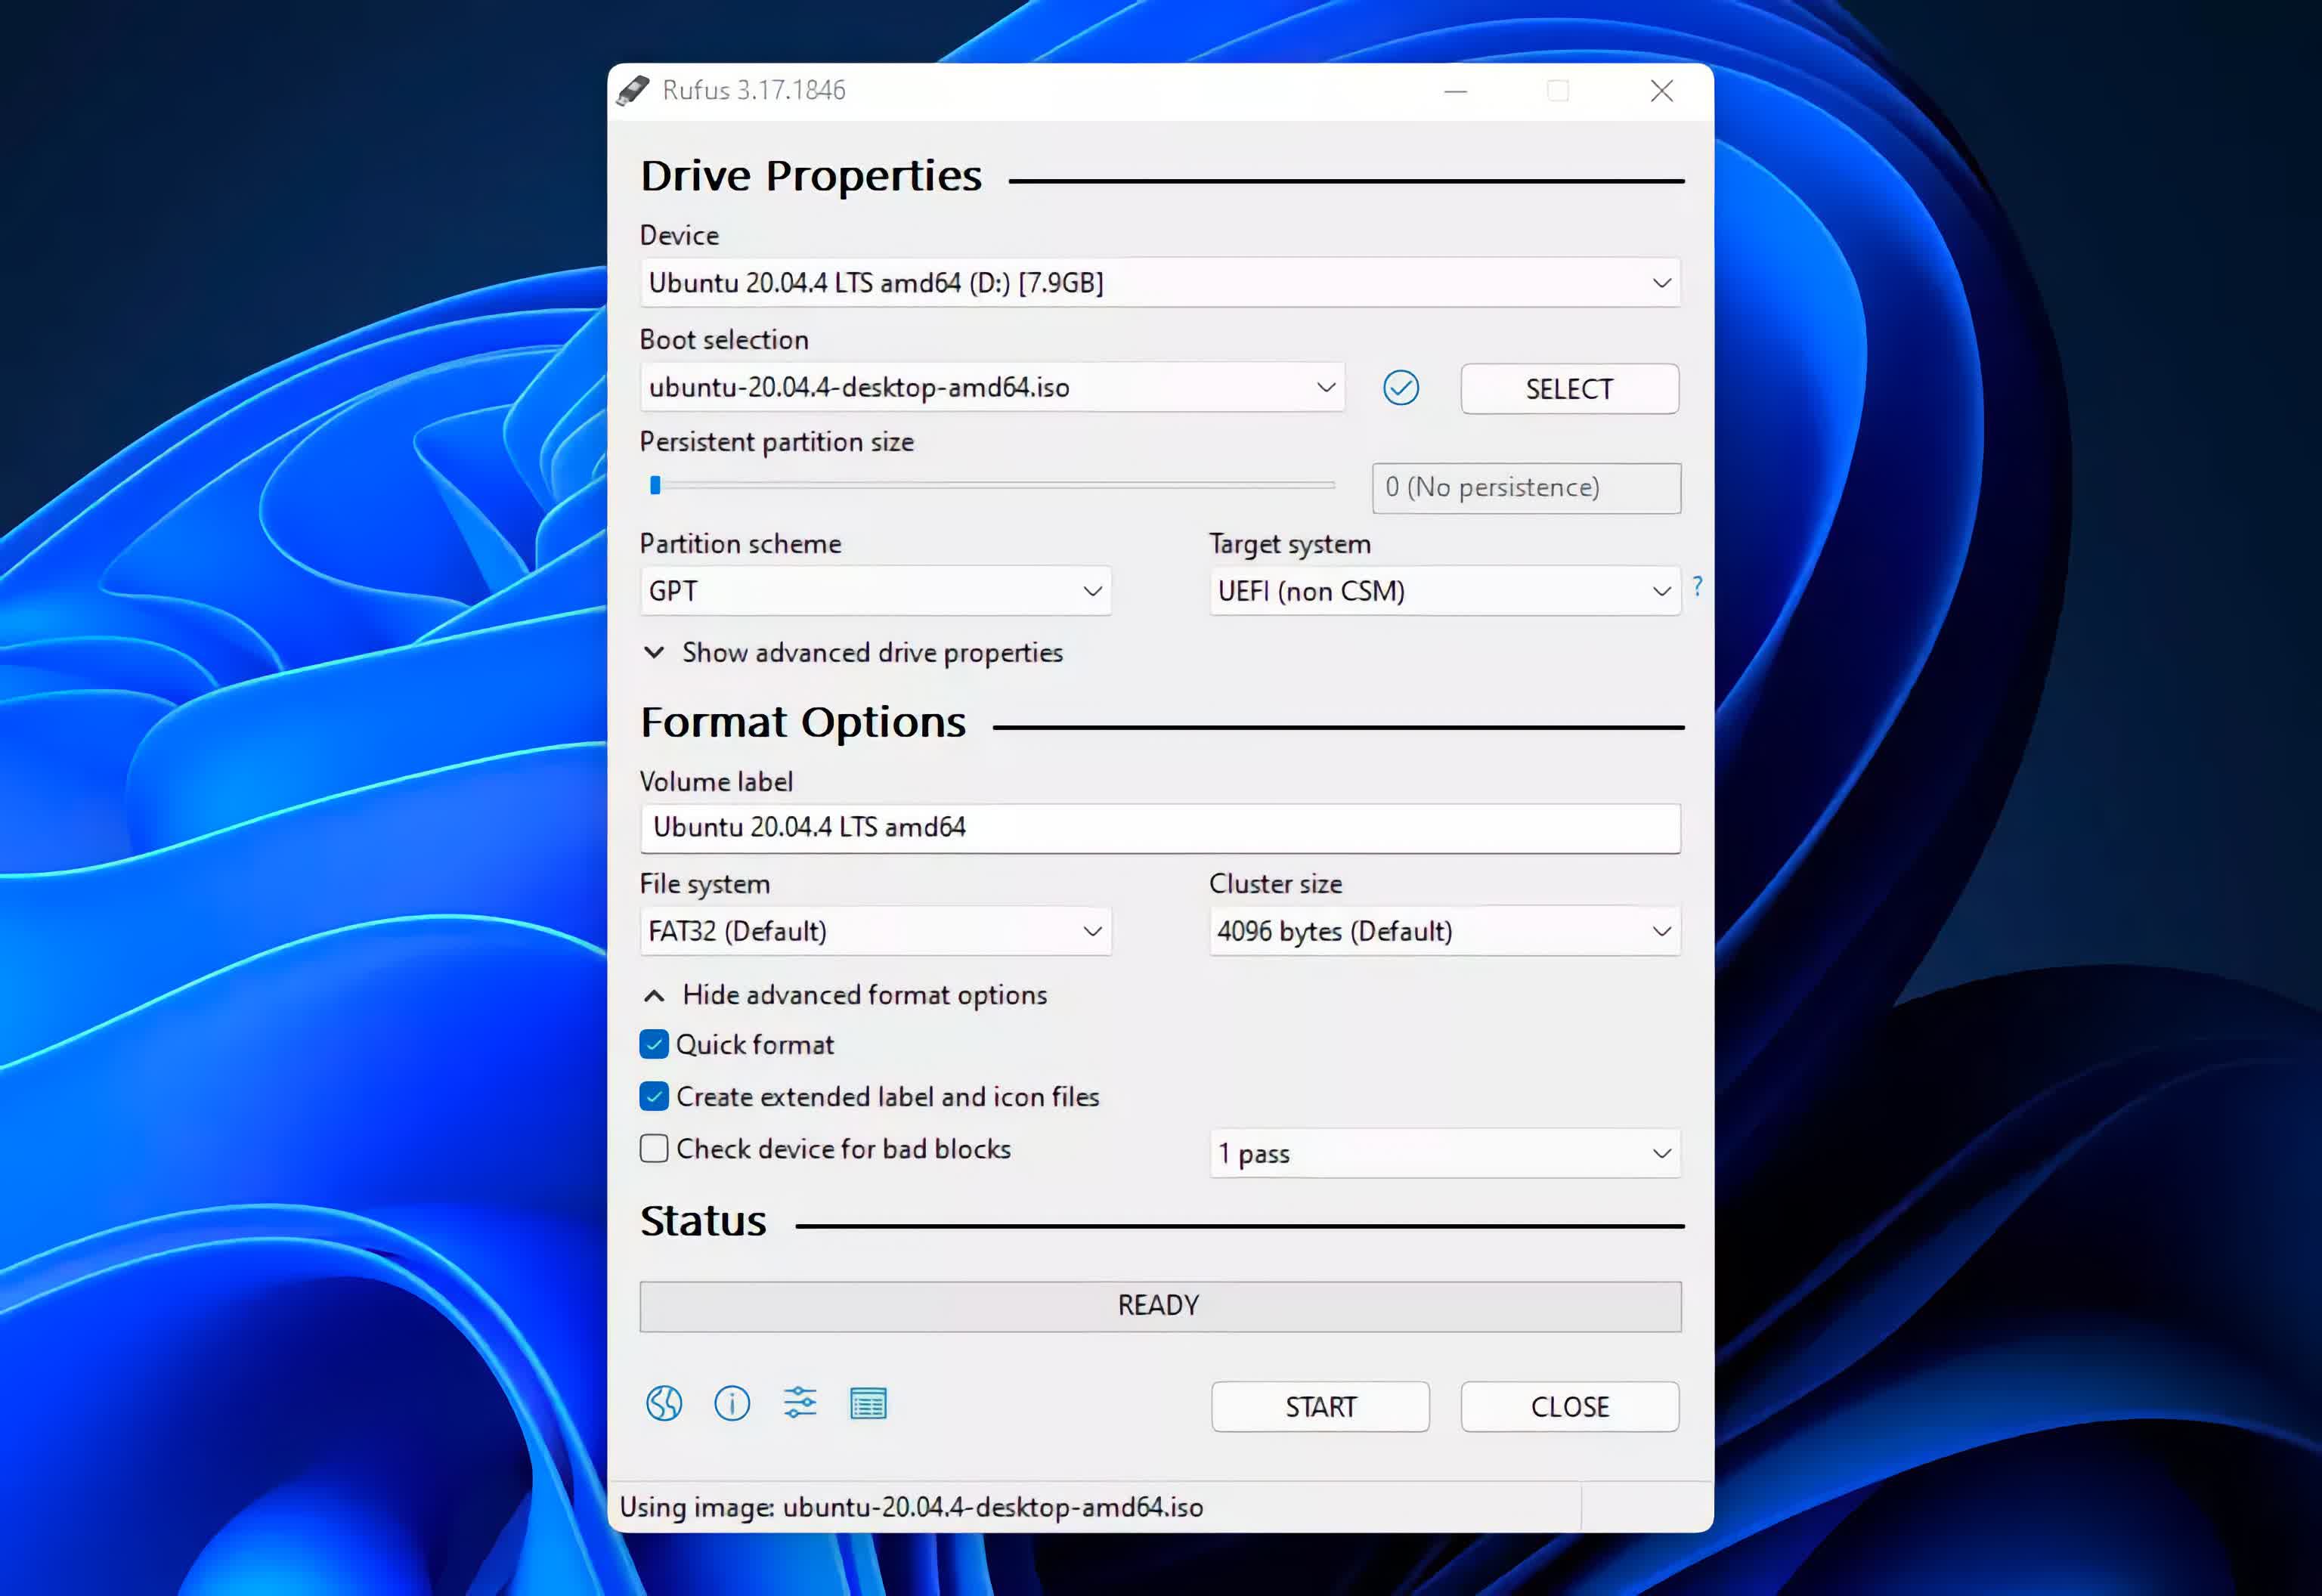
Otherwise, proceed forward by using Rufus to create a bootable flash drive with Windows 11. The image below shows our configuration.
2.3 Create a bootable thumb drives for OS 2: Ubuntu
Follow the same procedure as above, and create a bootable flash drive for the second OS you will be dual booting. Remember: use another USB drive altogether, to ensure that each flash drive contains only one bootable operating system on it. In fact, trying to use a single flash drive for both won’t work, as the second OS will force you to format the drive before preparing it.
Below is the configuration we used for creating our bootable USB drive with Ubuntu 20.04.
3. Install OS 1: Windows 11
If you already have Windows 11 installed, you can skip this step. Otherwise, plug in your Windows 11 flash drive, and go through the steps to install Windows.
4. Partition Management
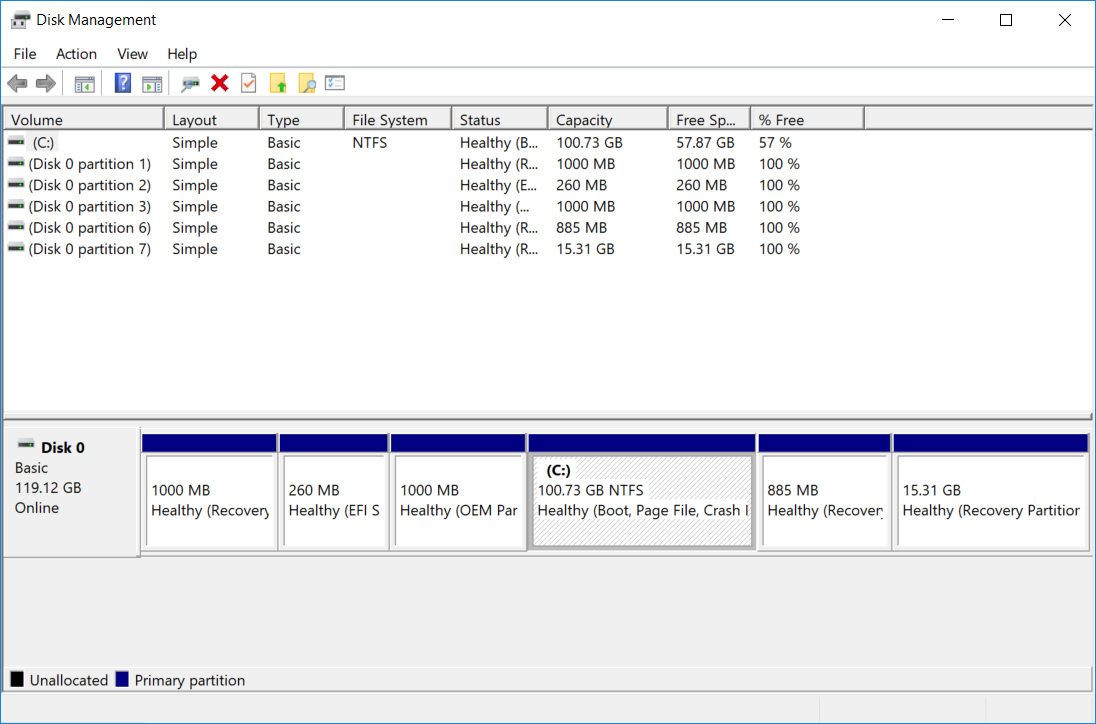
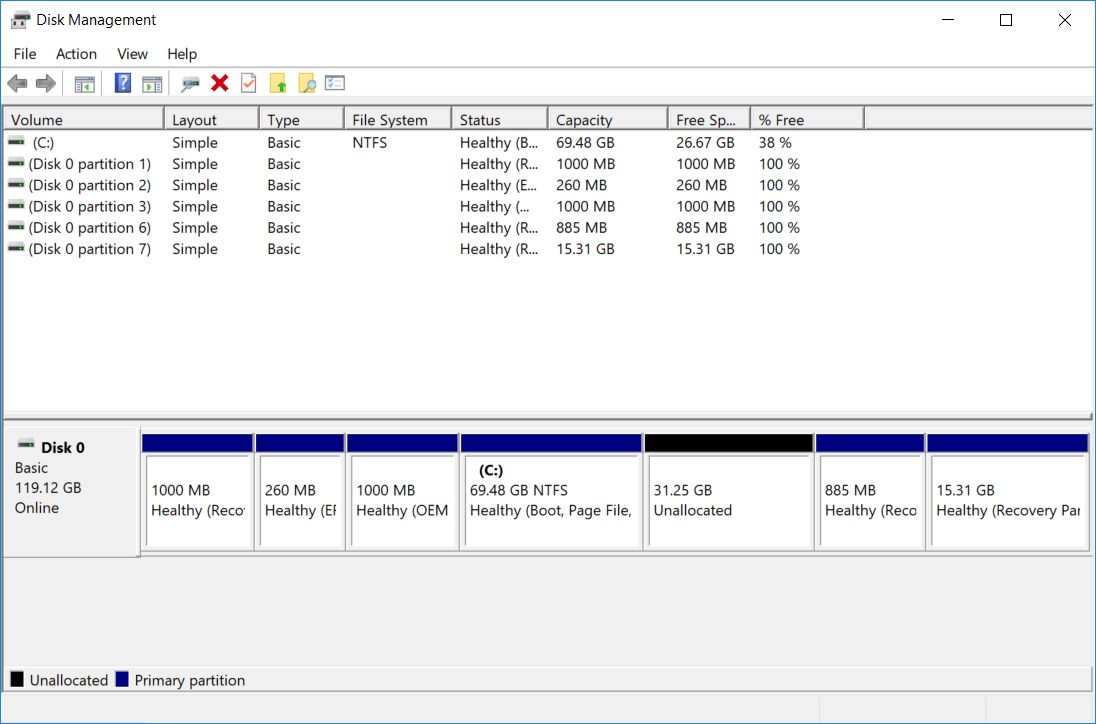
After installing Windows 11, boot up your PC into Windows and launch the Disk Management tool (Windows Key + X, select Disk Management from the list).
Select the current disk which has Windows 11 installed, and then right-click and choose “Shrink Volume.” In our example below, that is the C drive, which is at approximately 100GB.
In the pop-up window, enter the amount of space you want to reduce the disk space by and click the “Shrink” button to execute. In our example, the drive already has data in the Windows partition, so we will only shrink it by ~32 GB.
Remember to backup your files before performing any disk management operations.
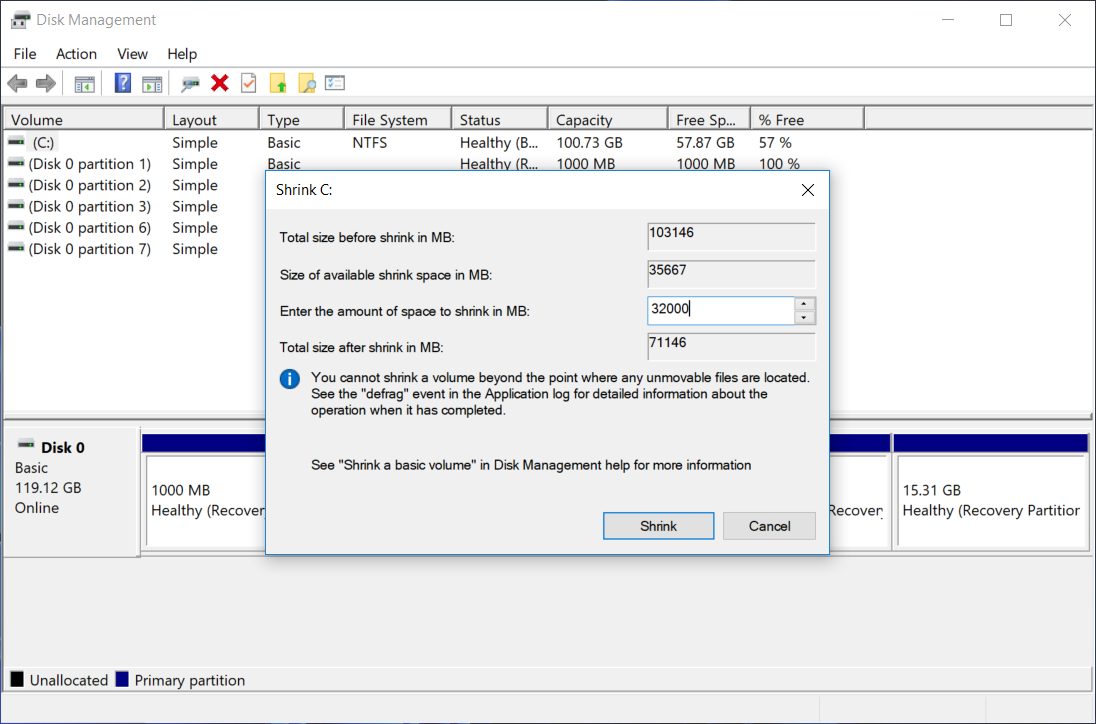
After performing this step, you will have “Unallocated” space on the disk at about ~32GB, which we will use when installing Ubuntu for the dual boot.
The Windows partition is now reduced to ~70GB, as shown below.
5. Installing OS 2: Ubuntu 20.04 LTS
After preparing your disk for Ubuntu by partitioning your drive, restart your computer with the Ubuntu flash drive in your PC.
Boot into Ubuntu using your machine’s boot menu, typically by pressing the F12 button during boot (or, depending on the motherboard, the button might instead be Escape, F2, or F10).
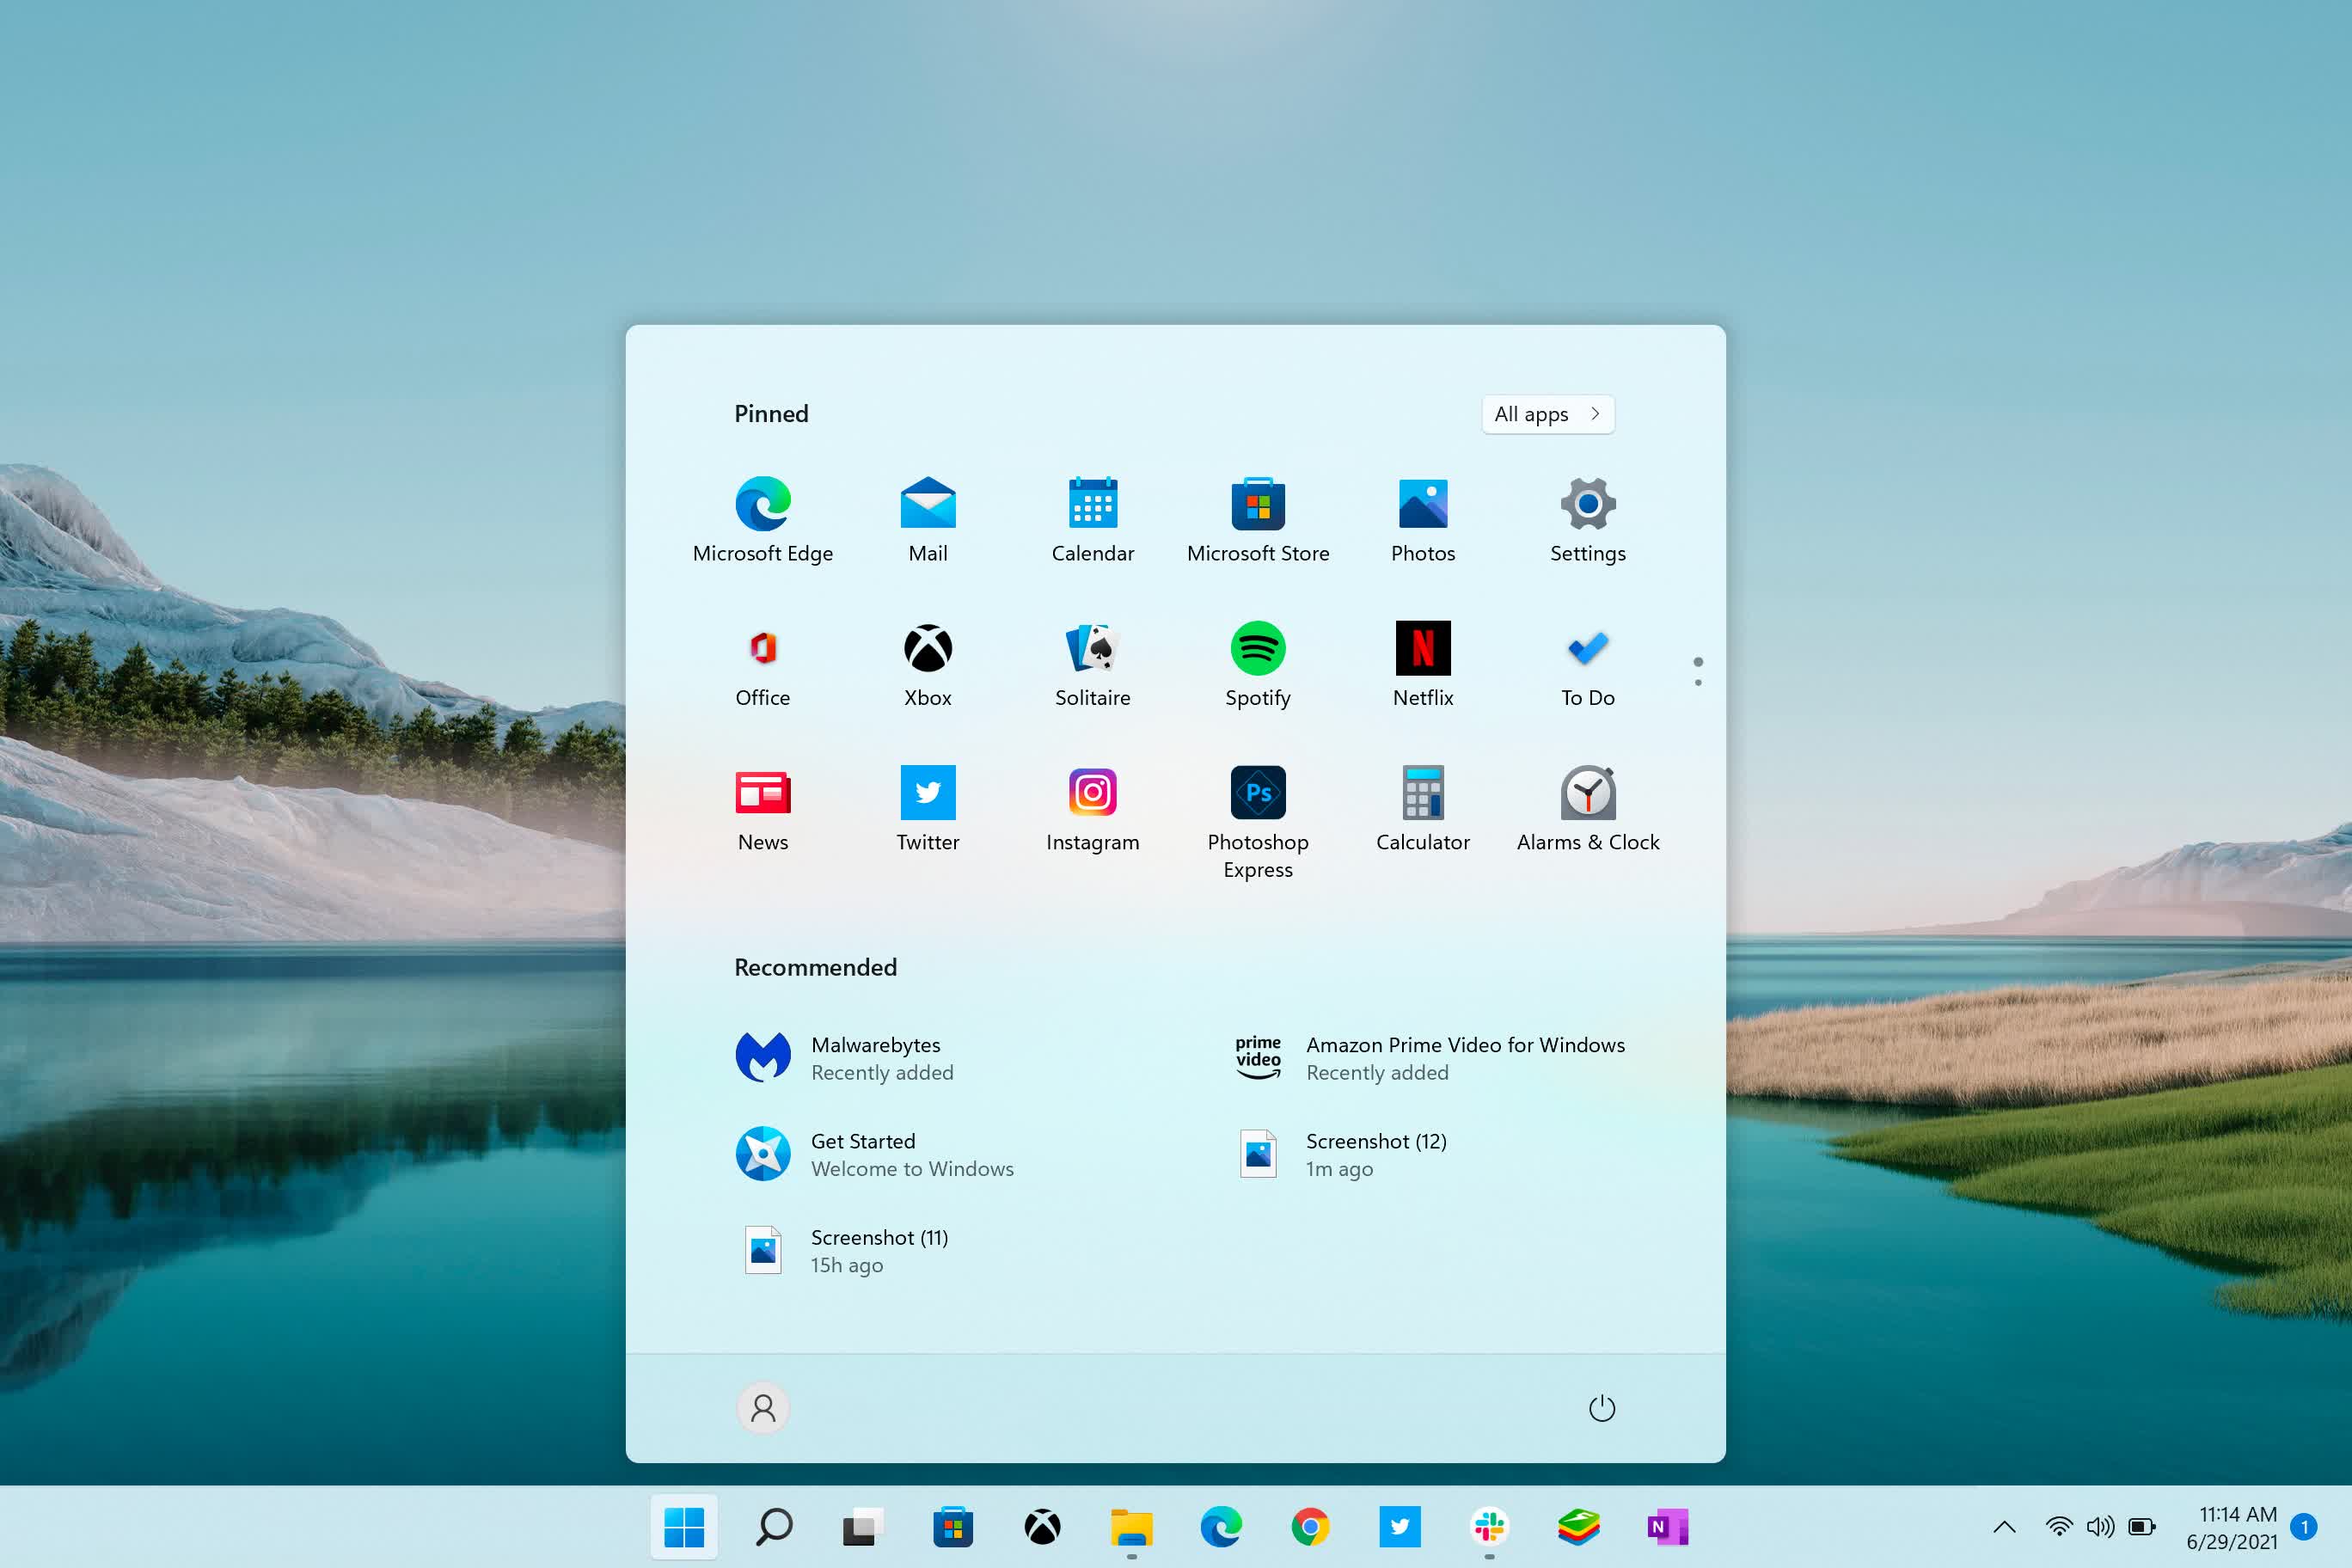
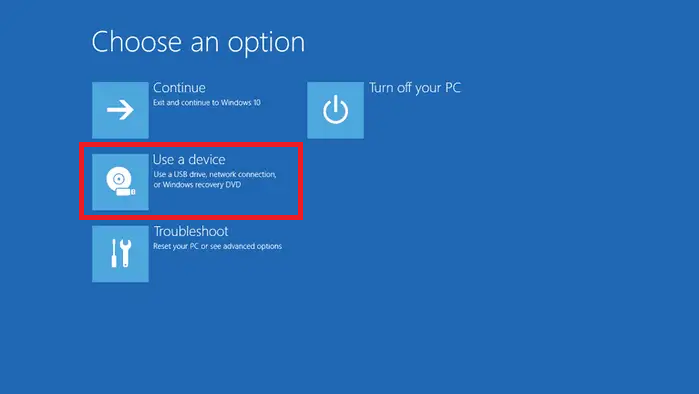
Alternatively, hold Shift while clicking on “Restart” in Windows. That will show a menu as shown below, where you can select “Use a device”. When your machine boots, it will automatically boot from the Ubuntu flash drive.
5.1: Begin installation
You should see a welcome screen as shown below, allowing you to “Try Ubuntu” or “Install Ubuntu.”
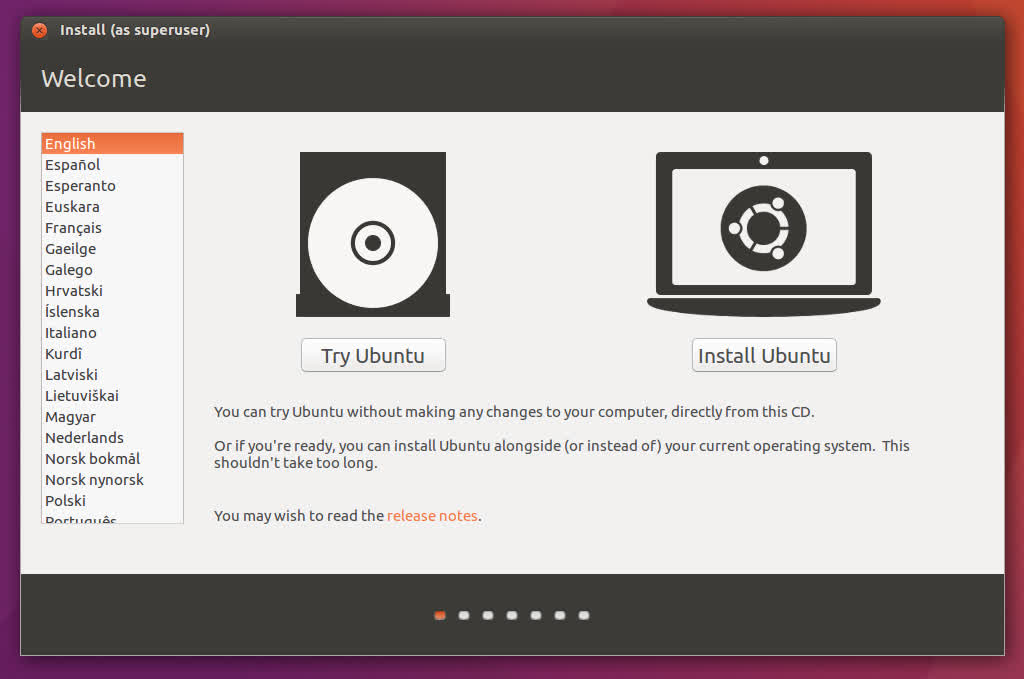
You can immediately begin the installation process by choosing “Install Ubuntu,” or you can explore Ubuntu from your live USB.
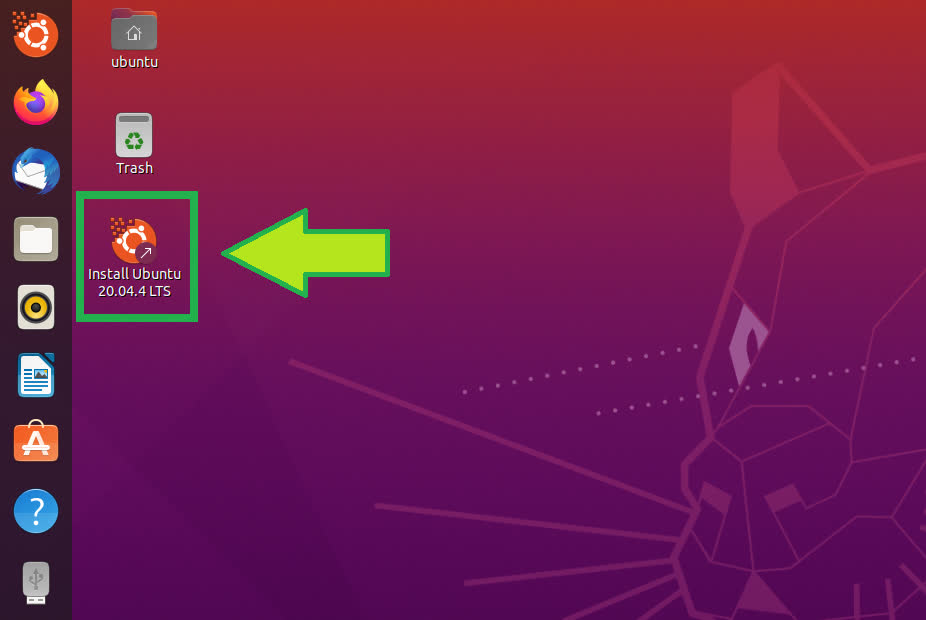
If you go with “Try Ubuntu,” you can begin the installation process at any point by choosing the “Install Ubuntu 20.04.4 LTS” icon on the desktop.
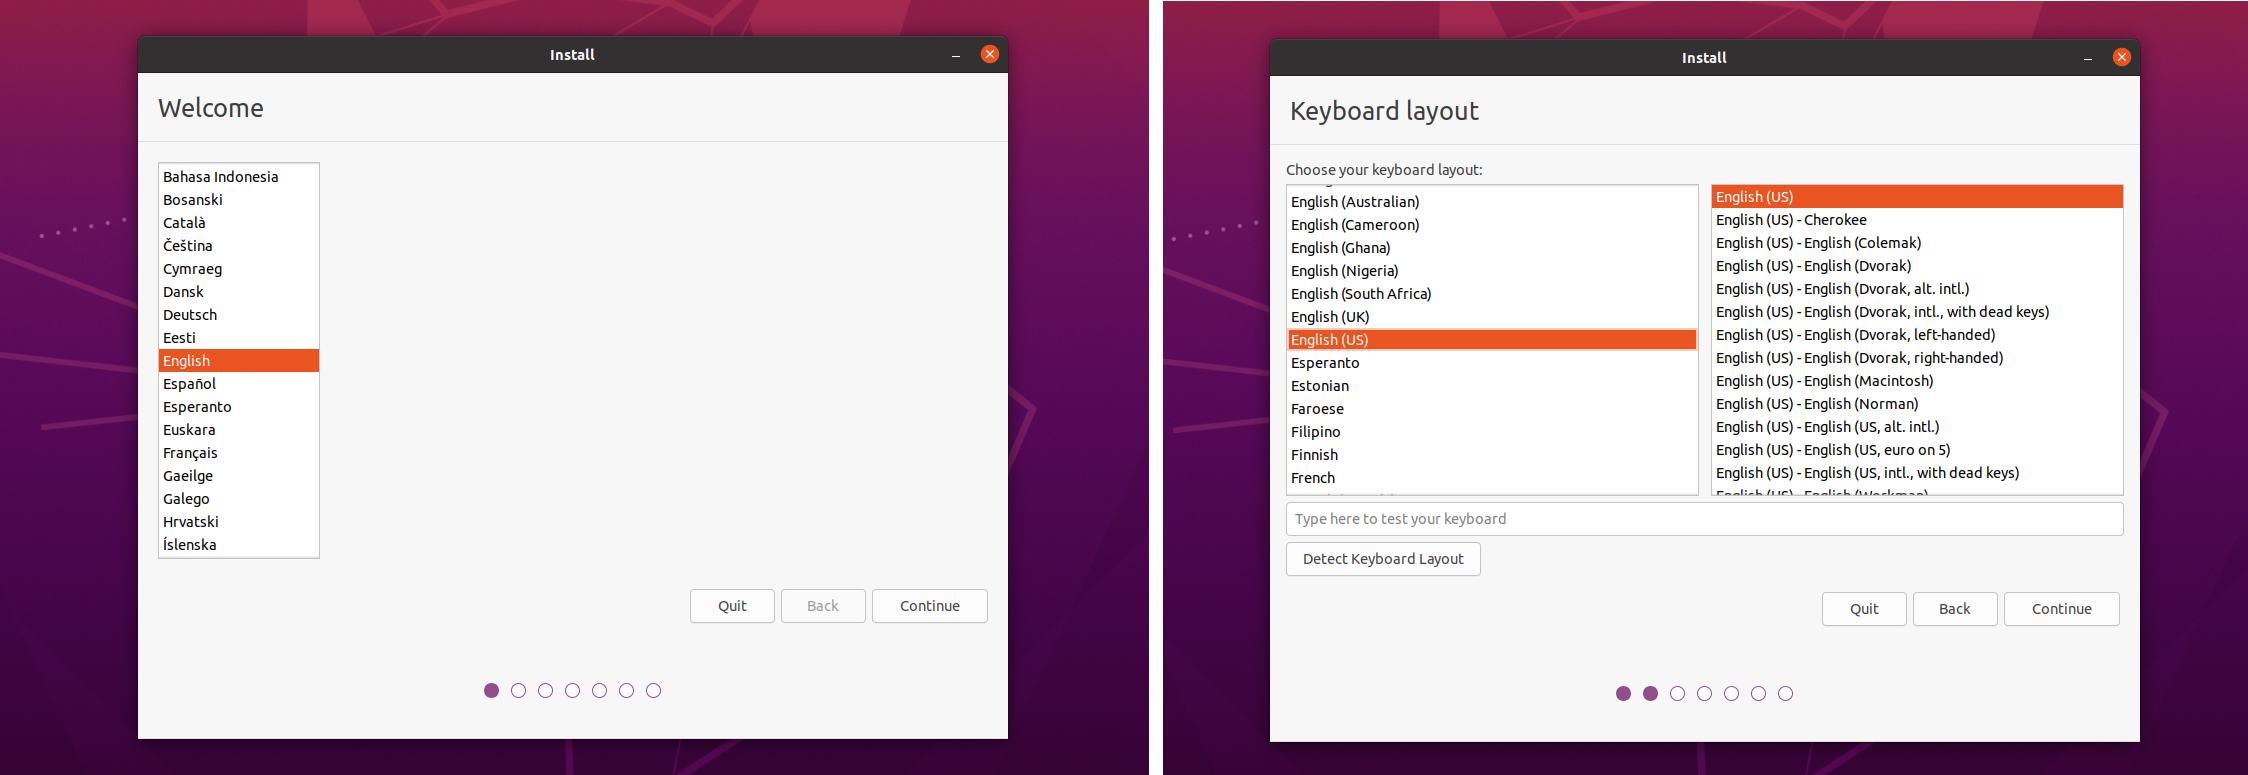
5.2: Language Selection
The Ubuntu installation begins with the language and keyboard layout. Select your preferred choices, and proceed with the installation.
5.3: Wireless Access and Other Updates
After selecting your language, you will be asked to input Wi-Fi settings for your home network. This is optional.
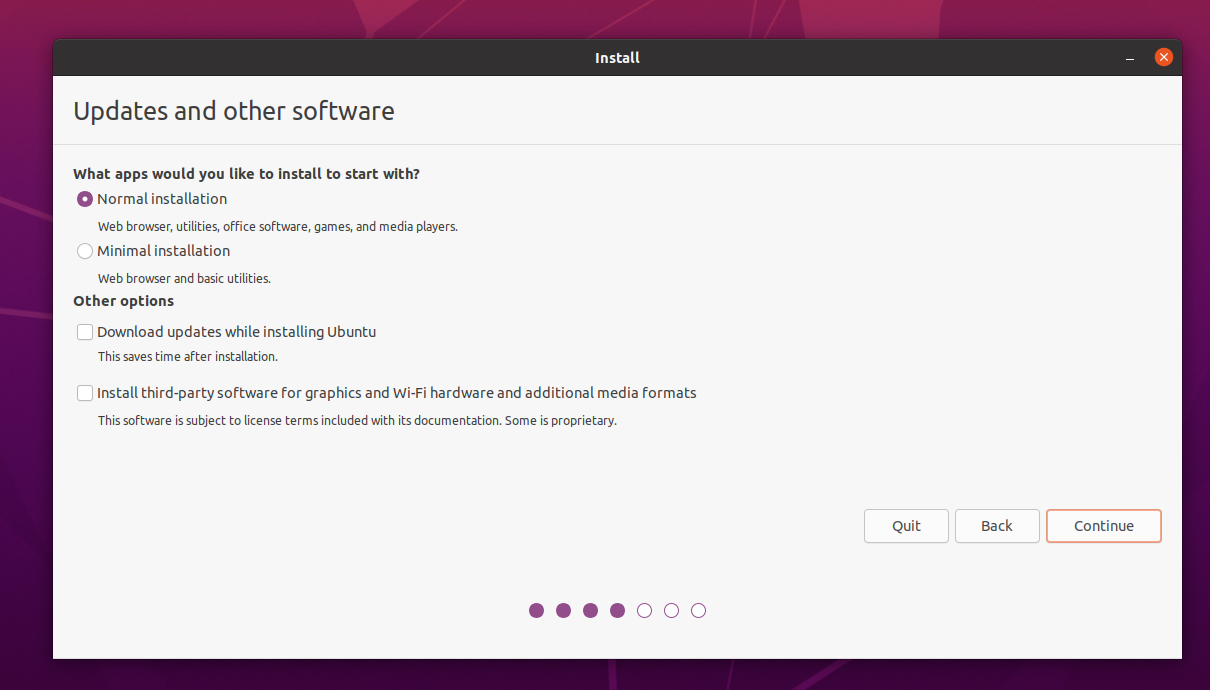
If you do, the following step will ask about updates and other software downloads to be part of the installation process. Again, this is optional, since you can always perform the updates and firmware installations after you finish the dual booting process.
To speed up the installation process, we suggest skipping optional downloads for later, and proceeding with the “Normal installation”.
5.4: Installation Type
This is the critical step: telling the installation process to install Ubuntu and Windows on the same disk and side-by-side, rather than overwriting your Windows partition.
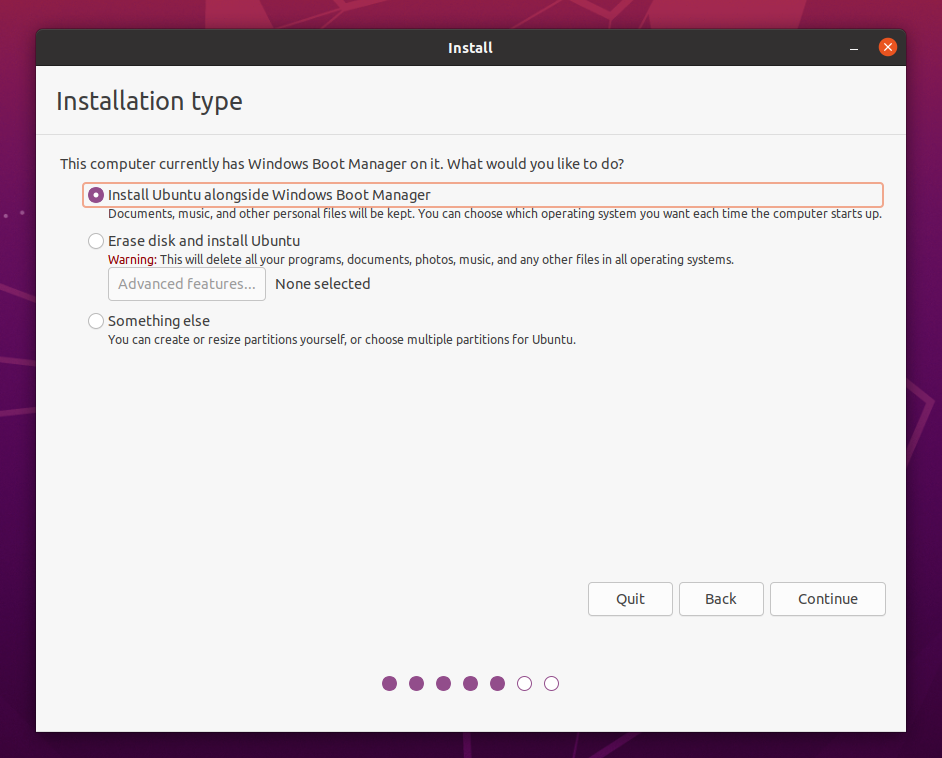
The first choice, “Install Ubuntu alongside Windows Boot Manager,” is the easiest and preferred way. If your disk has enough space on it, then proceeding with this method will provide you with a simple divider to decide how much space to partition to your Windows OS and how much to partition for Ubuntu.
We suggest allocating at least 25 GB of disk space for Ubuntu, as per the installation requirements.
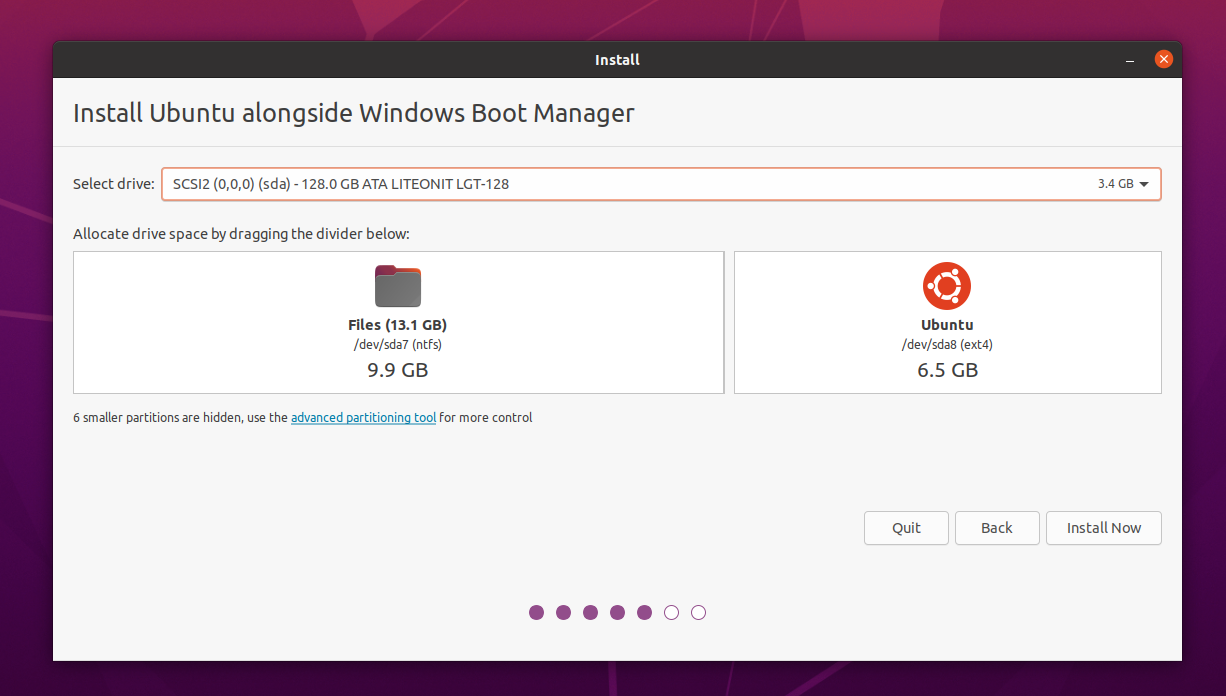
For various reasons, this method might not work (or be available altogether). In our setup in preparing this guide, our 128 GB disk did not manage to automatically identify all the free space, and only left us with 6.5 GB of disk space for Ubuntu.
In most scenarios, you’ll probably need to select “Something else” for the Installation Type, and manually prepare your disk for the dual boot.
Choose your SSD from the drop-down menu at the bottom (“Device for boot loader installation”), which will populate with the various partitions on your disk. Next, find the free space you’ve set aside from Step 4 above. While it might not be super obvious which partition that is, you can look for the “free space” name under “Device”, and check the size.
In our example, we had allotted roughly 32 GB for Ubuntu, and thus we find the partition with the closest disk size as highlighted below.
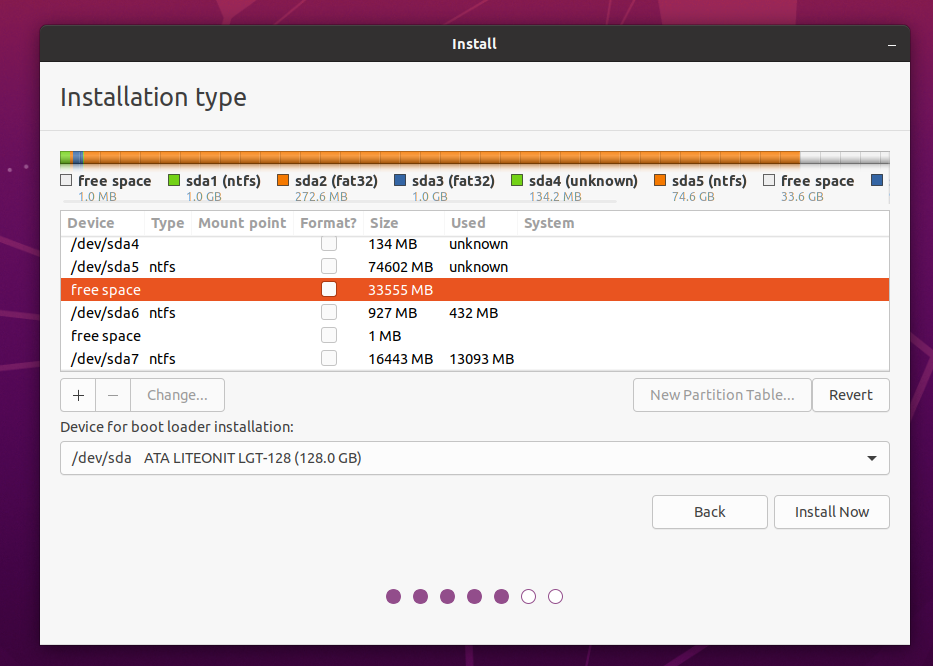
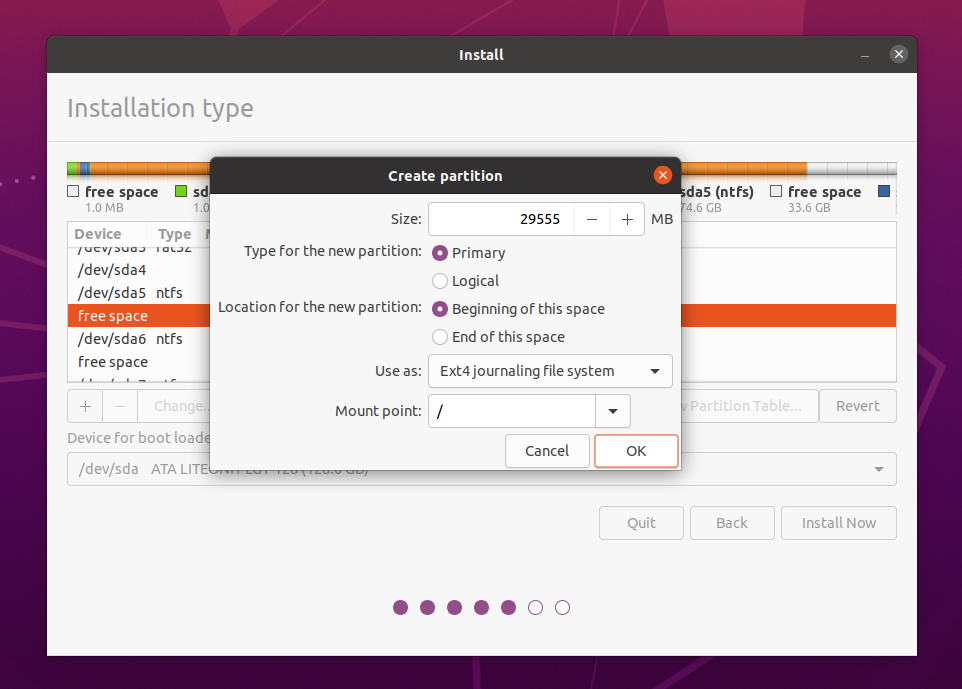
Now, click on the “+” sign to create a new partition. You will get a pop-up like below, allowing you to select the partition type and size. We will need to manually create two partitions out of the free space: one for the file system and one for swap space.
The first partition is for the actual file system, which will be in the ext4 format. Set the mount point to “https://www.techspot.com/”, and make sure it is a “Primary” partition type and the location is from the “Beginning of this space”. Notice that we reduced the size by about 4 GB, which we will use for “swap” space, described next.
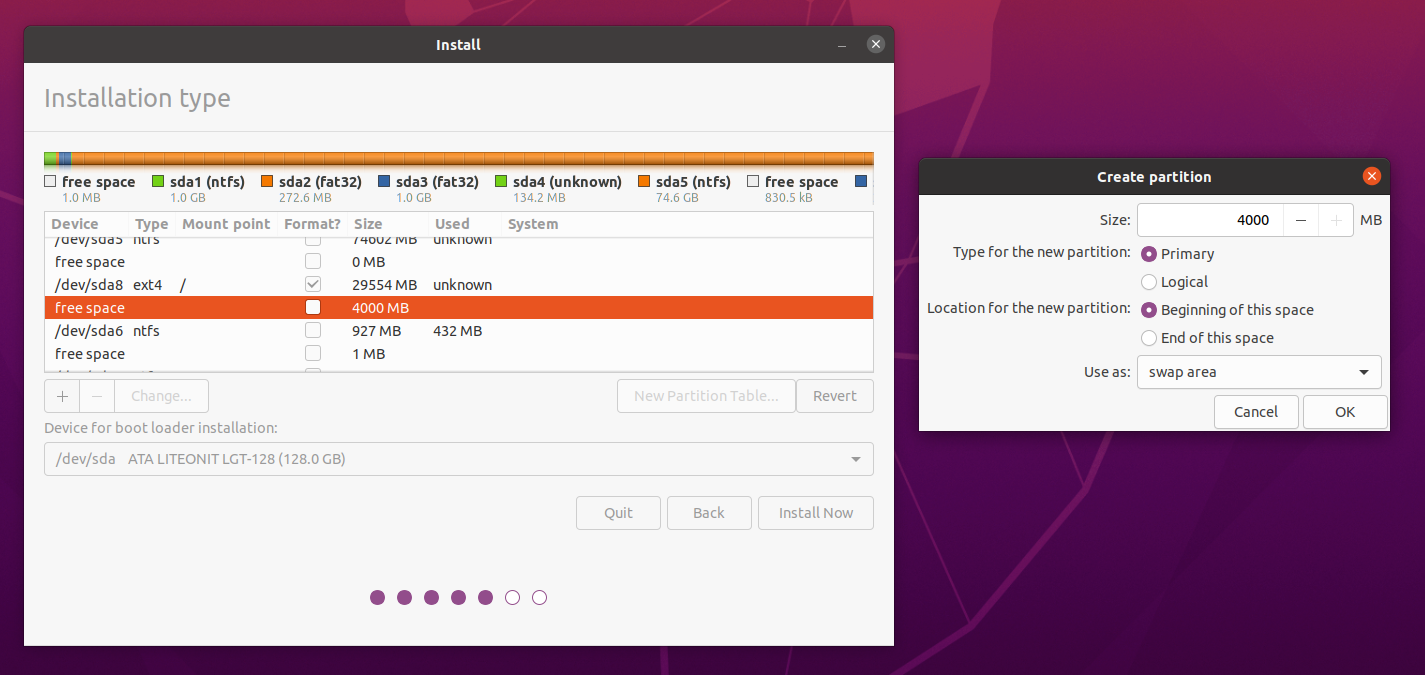
Next, choose the remaining free space (in our example, ~4 GB), and create a new partition as “swap area.” Swap space is essentially reserved space on the drive to be used if the physical RAM becomes full, to swap pages in and out of RAM.
The suggested amount of swap space depends on the amount of physical RAM in your system, and the amount of disk space you want to allocate as swap (which you won’t be able to use for files). The general rule of thumb is:
- Systems with less than 2 GB RAM – 2 times the amount of RAM
- Systems with 2 to 8 GB RAM – the same amount of RAM
- Systems with more than 8 GB RAM – at least 4 GB of swap space
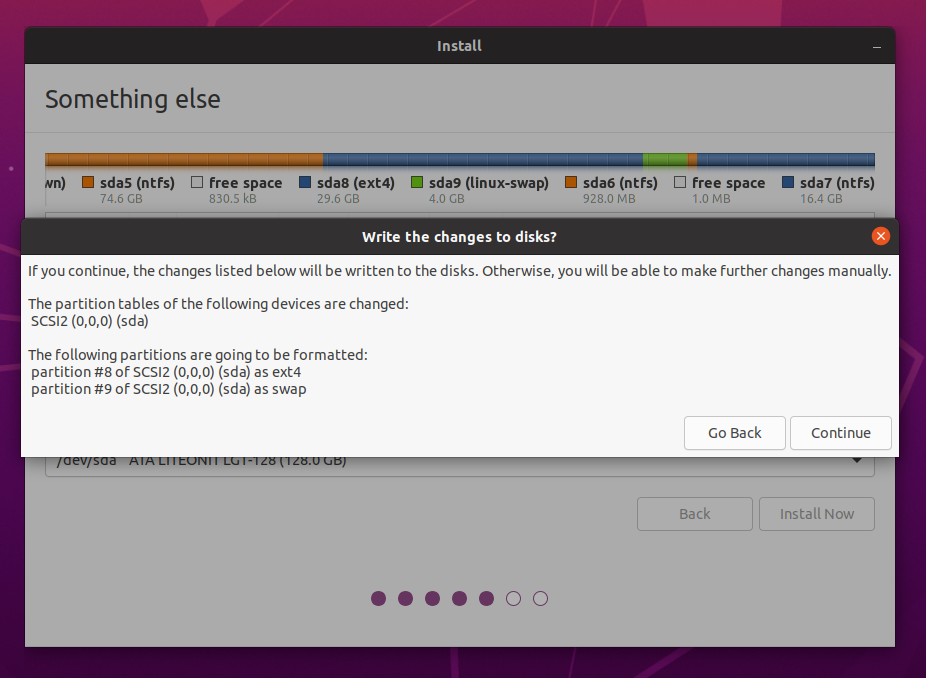
Everything should now be prepared, and you can continue the installation of Ubuntu by clicking the “Install Now” button.
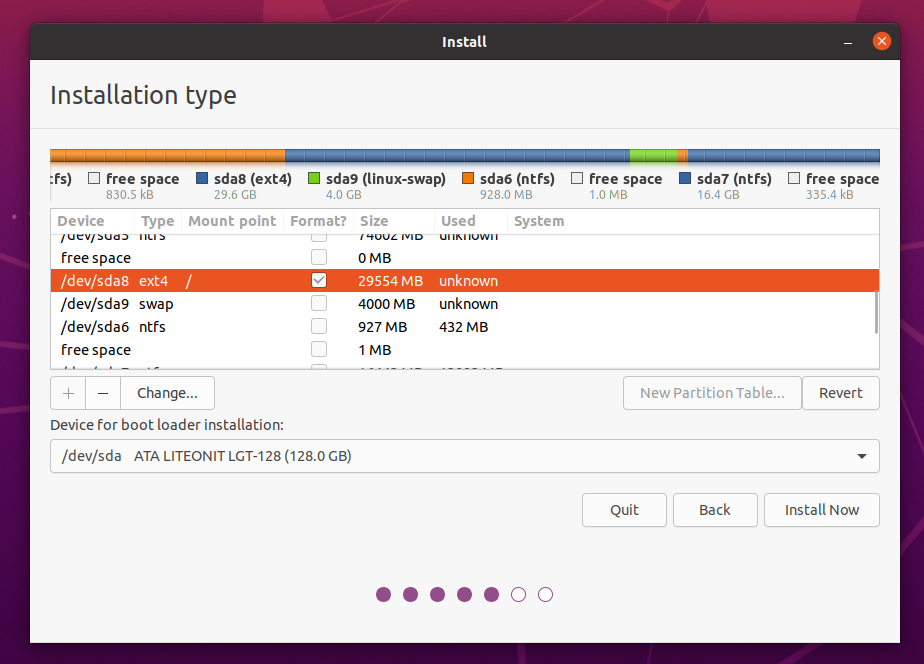
You will get one more confirmation describing the changes you just made. In this case, you will make two new partitions in the free space: an ext4 partition for the Ubuntu file system, and a swap partition for swap space.
If everything is in order, click “Continue.” At this point, the disk will begin formatting and applying your changes, followed by the Ubuntu installation.
Proceed through the rest of the installation until it is complete. Once done, you will be asked to reboot your machine.
6. Reboot and select the OS you want to use
After you finish installing Ubuntu, you will see the GRUB menu every time you boot up your PC. When GRUB shows up, you can select whether to enter into Ubuntu or boot into your Windows 11 partition.
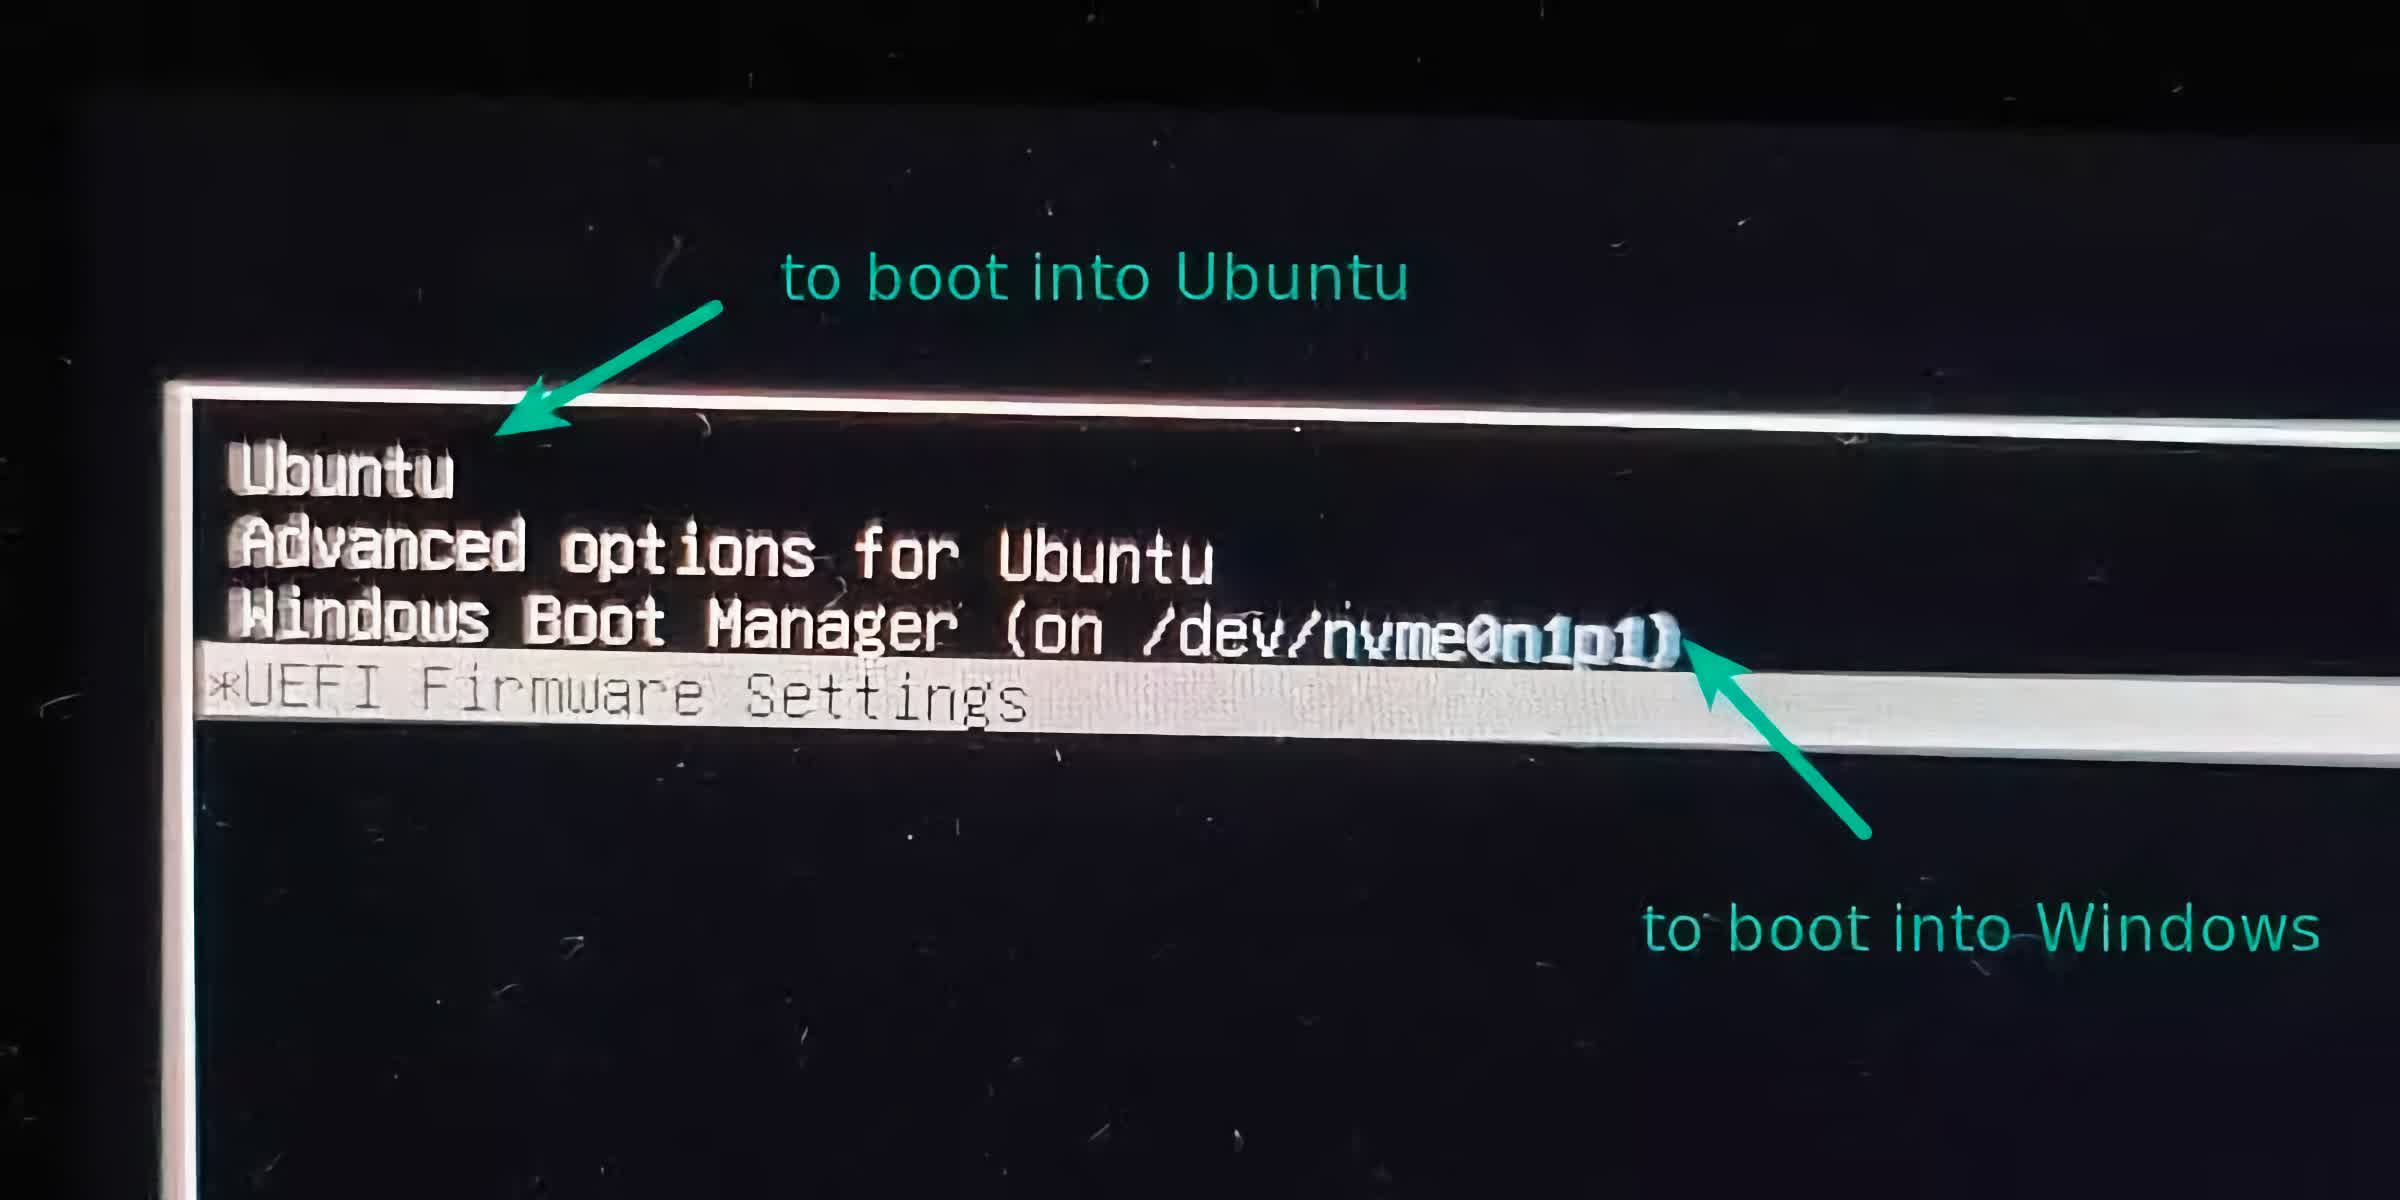
And that’s about it! Your PC now can run both Windows and Ubuntu from the same SSD.
Now, you can go about customizing your Linux environment, or boot back into Windows as if nothing changed.